• Choosing a travel pack is hard

    April 28, 2024

    An assorted group of 10 different black travel backpacks, two rows with 5 columns each.

    I love the “carry-on only” traveling style, it’s cheaper and you don’t have to worry about airlines losing your stuff. Outside of requiring a bit more planning, what’s not to love?

    Turns out this is a beloved product category with a passionate community behind it, and as a result a lot of manufacturers are making really awesome bags. As a result you see different bags with different strategies, and start to develop a taste for what you want.

    These bags are all incredible, but none are a perfect fit for me. I had the flu a few weeks ago and was writing down my thoughts on bags for an easy reference (I kept rediscovering the same bags every few months), but I thought I’d make it into a little blog post in case it was helpful to someone else bag searching. I’ll basically list a popular bag, and my thoughts on it.

    What I want

    Quick precursor to anyone yet bit by the backpack bug: there’s basically 3 categories of bags. The first, day bags, are normally between 10-20L and intended as a smaller bag to carry a few things at your destination. Every day carry bags (EDC) are normally 20-25L, a bit bigger, and for a short weekend trip, or just a good, general purpose bag that carries a decent amount but isn’t too bulky. The last category is a proper travel backpack, normally 30-45L, whose goal is to hold all your stuff for a decent length trip, while still being small enough to fit the carry-on dimensions for most airlines.

    I’m looking for that last category, a travel backpack, with specific goals:

    • Not a roller bag, too heavy, less flexible, and those with roller bags are often the first airline employees target when they need to start checking bags. I want a backpack
    • Not too heavy, ideally 2.5 lb - 3.5 lb (1.1 kg to 1.6 kg) for just the bag. I find beyond this the bag itself starts to have some heft, and it feels largely unnecessary when there’s super well-made bags in that “Goldilocks zone”. My scale is kinda: > 4 lb: why, > 3.5 lb: okay, > 3 lb: good, > 2 lb: dang!, < 2 lb: how.
    • External water bottle holder. Really don’t get why some manufacturers started putting them inside the bag. At worst it leaks a bit on your expensive stuff, at best it’s much more inconvenient to get at when walking around the airport and takes up space in the interior of your bag
    • Good laptop storage, with a slot for an iPad too
    • Not a zillion compartments. Some love this, which is totally cool obviously, but I like using packing cubes and a tech pouch, so I’d rather just have one massive vacuous main compartment rather than having a bunch of mini-compartments that take up space and add weight that I won’t use
    • A space to put a small day bag. I love travelling with a good sized travel pack, but having a day bag inside it so when I get to the destination I can leave the hefty bag at the hotel/Airbnb and just carry a light bag. I use the Aer Go Pack 2 for this, which isn’t as packable as some daypacks because I still want something with some laptop padding, so I need an area to slide this in, which is normally pretty easy
    • Stowable backpack straps. Sometimes you’re just throwing it in the back of a car and driving somewhere, and being able to hide the backpack straps to make it just a sleek little grab bag is super handy
    • Compression straps on the outside to cinch it down a bit if needed
    • 35L to 40L capacity, I find below that and it’s too small for a decent length trip, and above that you start to get into issues with some airlines deeming it too big a carry-on
    • Quality back harness system. Be it trekking between two far apart terminals, or a long walk to your hotel at the destination, having the bag be super comfy on your back, with padded straps, a sternum belt, and a hip belt, and ideally load lifters to position the bag on your back, is super awesome
    • Zip-open suitcase/clamshell opening style. It has to be able to open fully versus a normal backpack that just zips down partway, otherwise it’s a pain to get at anything at the bottom of the bag

    What are liters even

    One quick note before we start, is that bags are measured in liters (a measurement of volume), but how manufacturers measure their volume is all over the place. Some measure how much the interior will hold, some measure how much space the bag itself takes up, some seem a little disingenuous period. It’s all very hard to tell just based on the listed capacity of the bag.

    Shout out to OneBagTravels, far and away my favorite YouTube bag reviewer because he actually stuffs the bags with packing peanuts and measures the resulting capacity rather than just repeating manufacturer claims. I wish every reviewer did this.
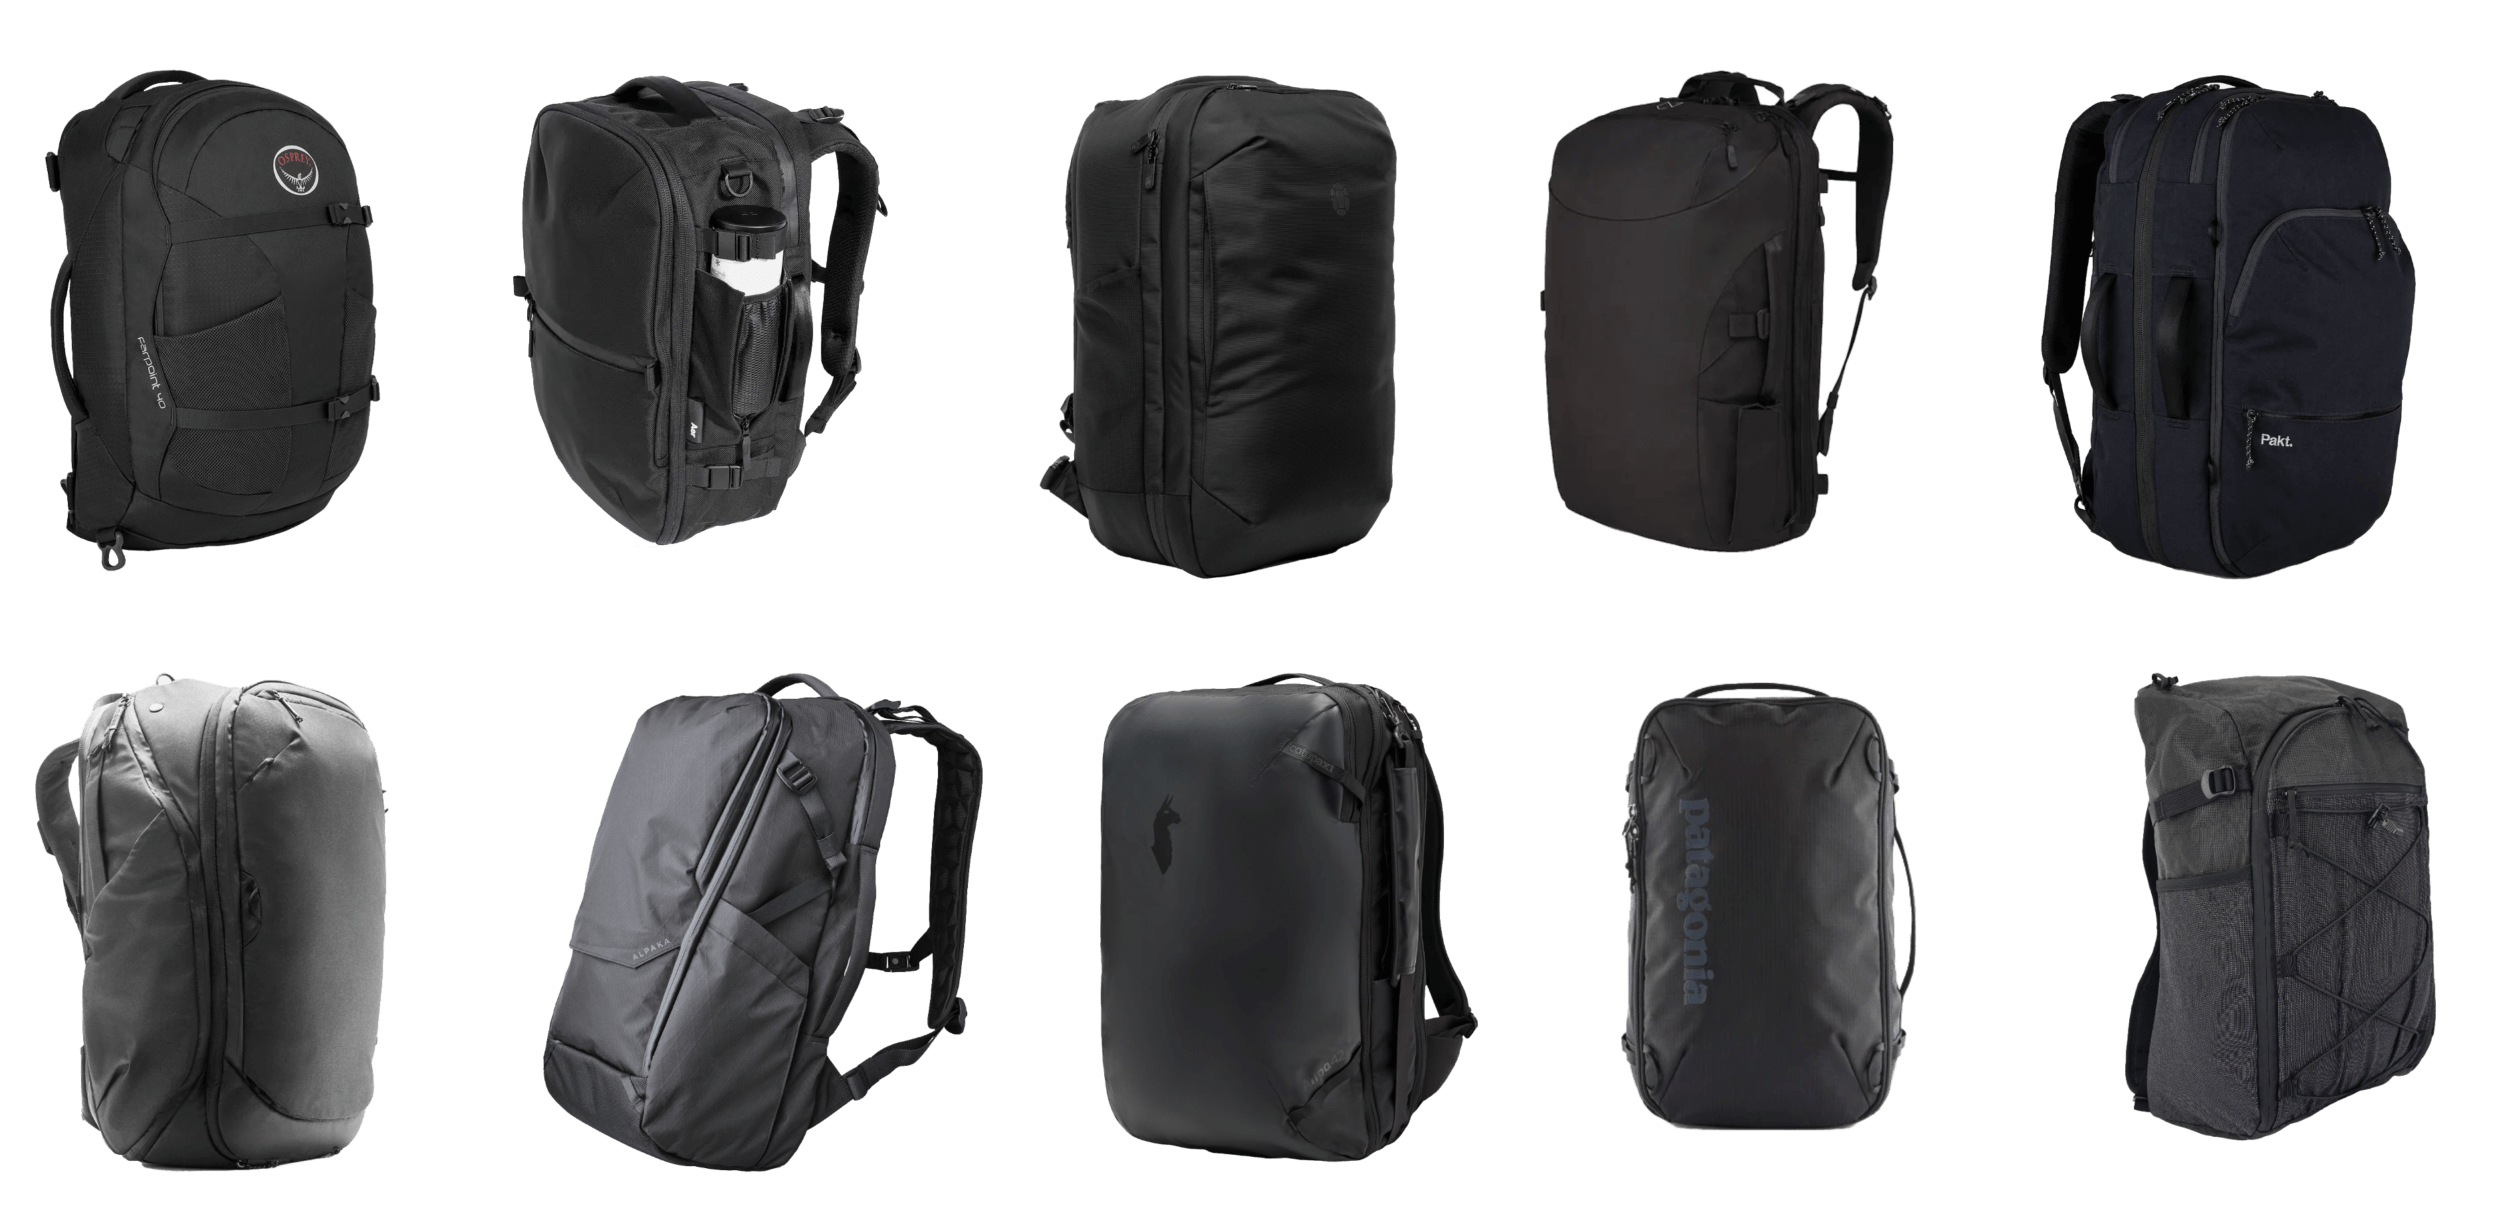
    Backpacks

    Okay, here are a bunch of the bags I’ve encountered, and my notes on why I love them and why I don’t. Again, this is not saying any of these bags are bad, one or more might fit you perfectly, but for my priorities personally they’re all missing something.

    Osprey Farpoint

    This has been my go-to bag for the better part of a decade, and it’s gone all over the globe with me. I like it a fair bit, but I don’t love it.

    Good

    • 40L and holds a ton
    • Light (my bag weighs 1.32 kg or 2.9 lb)
    • Despite being light and trekking around the globe with me for ages still almost looks new, so I can safely say this bag is very well made
    • Super comfortable, robust harness system that you can zip up to completely hidea

    Bad

    • The laptop compartment is at the front of the bag, as opposed to close to your back, so the weight balance of the bag isn’t great, and it can be hard to put the laptop in (this has been fixed in a more recent bag revision, though)
    • The water bottle holders are just… bad, in that they’re both at the front (hard to access when wearing the bag), and hold water bottles so poorly that the bottles almost jump out of the bag
    • There’s also a lot of dangly clips and straps everywhere
    • I wish you could hide the hip belt separately since I only use it once in awhile, but you either have to hide all the backpack strap area, or leave it all open
    • It only zips open like 90% of the way so packing things into the bottom is a bit awkward
    • The shape when fully packed out is kinda weird and bulges from the center out, kinda looking like a potato chip at the top, would prefer something a bit more boxy

    Aer Travel Pack 3

    I love Aer bags, so I bought this with high hopes but ultimately returned it.

    Good

    • I love how it looks
    • Sidewalls are slightly less floppy than my Osprey Farpoint so easier to pack into
    • Very comfortable harness system (though lacks a hip belt)
    • Straps are well thought out so it doesn’t dangle a bunch
    • Zippers feel super premium
    • Nice, functional boxy shape
    • Love the front slash pocket for something like a light rain jacket

    Bad

    • It’s really heavy, at 4.1 lb it’s 40% heavier than my Osprey Farpoint and you can really tell. It feels like the difference between a MacBook Air and a MacBook Pro, except it holds less than the Osprey which is already incredibly made so it kinda just feels… over-engineered?
    • It doesn’t feel like it holds that much, especially compared to the Osprey. On the pack it says a 5L difference but it feels closer to 10L
    • The water bottle holder is almost criminally bad, it’s on the side at least, but does not do a good job of holding literally any water bottle I own, it falls out super easily. My other two Aer bags, a Go Pack 2 and a Pro Pack 20L, both have infinitely better water bottle holders despite being half the size, I’m so confused
    • Definitely a neutral for some, but I don’t like the admin/tech compartment. Like I mentioned, I use a tech pouch anyway (so I can easily transfer things to my day bag) and this cuts into the available storage area while also adding a decent amount of weight (it’s a hefty tech compartment, my attempts to measure it with a kitchen scale put it at about 0.4 lb alone). Also losing the admin compartment means less zippers on the outside, which makes it easier to know what to open to get to all your stuff.
    • Can’t hide the backpack straps at all
    • Minor one, but the top grab handle is in the middle of the pack, versus closer to one edge, which means if you try to hang it on a hook at a bathroom stall at an airport or something it’s really hard, versus bags like Ospreys that put it closer to one edge so a hook can still reach it
    • The laptop compartment almost feels too padded to the extent that it’s bulky. I only bring this up because the bag is already heavier than most, and this feels like an area where they unnecessarily added weight. All my other bags protect my laptop beautifully with much less bulk, though probably Aer’s alone could survive an actual fall out of a plane
    • Inside isn’t super visible, it’s like a dark grey, wish it was more of a light grey like the Aer Pro Pack 20L so you’d get increased contrast against your belongings. The darker it is inside the more it’s like an abyssal void

    I’d love to see Aer do what Tortuga did (see below) and release a “Lite” version that cuts a ton of weight off. We’re kinda due for a Travel Pack 4, so maybe?

    Evergoods Civic Travel Bag 35

    Great, but heavy (4 lb), and can’t hide backpack straps. Love that it just has one, vacuous main compartment though. Very expensive. Props for having a water bottle holder.

    Minaal Carry-On 3.0 Bag

    This is one of my favorites. Only weighs 3.1 lb, no tech compartment, has a pretty sleek look, and one big main compartment for item storage. I also love how the laptop compartment opens all the way, I think all bags should do this, that means I can easily stash my day bag in there flattened down.

    On the bad side the water bottle holder looks as bad as Aer’s, it’s very expensive, the inside is black so it’s like a void, and the storage system seems weird. Like, instead of the part closer to your body holding the clothes, it flops open and the floppy part holds the clothes, and it looks quite floppy. Also it looks like the main compartment has packing cube style zippers built into it which take up volume, and again I’d rather just use my own.

    I feel like this bag is a small revision away from being perfect. Again we’re due for a Carry-On 4.0 revision, so maybe? I would rank this number 3 currently.

    Ablecarry Max

    30L is kind of awkward, a large bag for daily use but a bit small for traveling. Love the design visually though. No external water bottle holder.

    Tortuga Backpack Pro

    Too heavy (4.5 lb!!), not personally a big fan of having a separate tech compartment, price is kinda bonkers. Lacks stowable backpack straps.

    Tortuga Backpack Lite

    Love this one a lot, in my top three. 1lb less weight than the Pro version. Downside is no iPad compartment, which is unfortunate because even just a small piece of fabric separation would have been nice, but they did ditch the admin compartment which is nice. Would have been great if they made the laptop compartment zip all the way open like the Minaal so you could shove a day bag in there easily too. I also wish they would also ditch the dividers in the main compartment which take up space and require you to organize your things within them, rather than just using packing cubes which I’d prefer. Yay you can hide backpack straps, and looks like it has an awesome water bottle holder. Have to knock down a point for being incredibly hard to acquire in Canada for some reason. Looks like a nice functional boxy shape too.

    Again, almost perfect, and $100 cheaper than the Pro version at $250. I would rank this number 1 of these bags for me, but still not perfect.

    Tropicfeel Shell

    Really like the design of this one, and it’s on the lighter side at 3.3 lb. Water bottle holder looks good. Seems quite small for its claim of holding 40L, wish a channel would do the ol’ packing peanuts test but I couldn’t find any. It almost seems like it can only store 40L if you open/unroll the top fully but then your stuff is kinda exposed? Can sorta stow backpacks traps with a clever clip-across system. Wish the laptop compartment was fully separate so I could stow my day bag in there separately. I like this one a lot.

    Tom Bihn Synik

    No external water bottle holder, a bit small at only 30L. Harness system seems a bit minimal. Not much laptop padding and no iPad slot. Love how vacuous the bucket storage area looks though.

    Pakt

    Love the creativity and thought put into this bag, but for me a bit too organization heavy, and as a result also a hefty boy at 4.4 lb for the 45L version, or 4.1 lb for the 35L version. Also very expensive, and the water bottle holder looks dubious. I like that the bag is expandable or has room for a day bag, which would be nice for the 35L version to get a bit more space. Wish it had stowable backpack straps.

    Would love to see them produce a slightly more minimal version that’s a bit cheaper, and lighter while still retaining the half-and-half main compartment opening where you can put packing cubes on either side.

    Heimplanet Transit Line Travel Pack

    34L, okay weight at 3.6 lb. Doesn’t open fully clamshell, only about 2/3 of the way down if you want to open it “normally”, but if you remove the divider between the laptop compartment and main compartment it zips all the way, but then it’s one big compartment shared with the laptop, and the packing part is on the floppy side of the bag.

    Topo Designs 40L

    I like that the backpack straps are nicely stowable. No iPad holder in laptop compartment, which seems small overall and on the side. Has a tech compartment unfortunately, but I like that the inside is just a big bucket. Water bottle holder is external but looks quite tiny.

    Thule Aion

    I like this one a fair bit, 40L and a svelte 3.2 lb. I don’t love the exterior material (waxed canvas), and wish they went with something a bit more… normal? It looks like it breaks in weirdly per YouTube reviews. Love how it just has one massive compartment that opens horizontally, but I wish that the compartment on the “ceiling” of the main compartment didn’t have its own volume, which it appears to which can take away from the main “bucket”. Good water bottle holder. Not in love with the horizontal laptop compartment, but at least it has room for an iPad. If it was a fully zip-open compartment I could put a day bag in there too which would be nice, but as-is not sure where I’d put that. Has a nice small admin compartment/pocket thing at the top. Grab handles look pretty meh. No external compression straps which feels like a bit of a miss. No stowable straps.

    REI Rucksafe 40

    Pretty impressive bag. 40L, under $200, and 2.85 lb. Has an external water bottle holder. No padded laptop compartment is really meh though, so is the lack of iPad storage. Really don’t like that it zippers all the way open to the extent that the interior would only have 3 walls and stuff then spills out the top, and it also doesn’t zip all the way to the bottom of the bag. No stowable backpack straps.

    Kathmandu Litehaul 38

    Hard to tell but looks like the newer bag moved the water bottle holder so it takes up room inside the bag, bleh. Side laptop compartment (eh), with no iPad storage. Nice compression straps. Stowable backpack straps with a great harness system in general. Love how cavernous it is with minimal organization (yay). No real place to stow a daybag, maybe the “ceiling” of the main compartment but the zipper looks a bit small.

    Wandrd Prvke 41L

    Not a lot of reviews on this one so hard to tell a bunch (most reviews are geared toward it as a camera bag), but looks like a nice bag. 41L (46 with rolltop extended), and a firmly “okay” 3.7 lb. I think I’d prefer to see a less complex version without a rolltop and without the inner division pocket thing in the main compartment. Water bottle holder looks good. Wish laptop compartment was separate so I could shove a day bag in there too but it does have a nice iPad holder. Doesn’t really advertise stowable straps but looks like you could sorta fish the straps underneath the luggage passthrough and it would organize it a bit?

    Timbuk2 Impulse

    Love how this looks, love how it’s just a big cavernous compartment. 45L is impressive, 3.7 lb is okay. Side laptop compartment is okay, no iPad storage though. But no external water bottle holder, straight to jail. Stowable straps though!

    Timbuk2 Wingman

    Also no external water bottle holder, come on Timbuk2! 38L, but a hefty 4 lb. Stowable backpack straps! Side laptop storage, no iPad storage. Love the cavernous inside. This bag confuses me, seems like a heavier version of their Impulse that holds less?

    Goruck

    Totally get why people love this, very iconic design, looks super well built. Just not my style visually, a bit too tactical, and they’re pretty hefty in weight (4.5 lb for the 40L).

    Waterfield X Air

    Pretty decent weight at 3.6 lb, with a 40L capacity. Water bottle holder looks a little concerning (Aer-TP3-like). Love the yellow interior, but don’t love the inclusion of the front admin compartment personally. Love that it opens horizontally like a suitcase rather than vertically, both are great but horizontal just feels even nicer. Overall not that many reviews of this bag so hard to tell a bunch.

    North Face Basecamp 35L

    Love the look, but really wish North Face toned down their branding. 3.5 lb and 35L is pretty decent, but the harness system seems kinda meh, no stowable straps, no hip belt. Admin compartment seems to take up a decent amount of volume. Laptop compartment doesn’t seem to have an iPad compartment. Love how it’s just one big compartment. Honestly would be a pretty great bag if it was a hair bigger, had a hip belt, and the laptop compartment opened all the way. Great price too.

    North Face Router 40

    2.9 lb, nice! Water bottle pockets don’t seem super well reviewed (they’re very big without much stretchiness so lots of water bottles will just fall out). Love the minimal front pocket. Wish it had stowable straps. Compression straps seem awesome. Laptop compartment opens pretty wide, not all the way down, but could probably shove a day bag in there easily, also has room for an iPad. Main compartment doesn’t open all the way which is really unfortunate. I’m almost doubtful it holds a full 40L somehow, wish a YouTuber would do a packing peanut test.

    Linus Tech Tips Backpack

    Not really a true travel backpack at only 26L, seems more geared as a personal item and seems great at that. Mostly including it here to preempt recommendations for it as a travel bag.

    Nomatic Travel Bag

    Aesthetics kinda don’t do it for me personally, looks a bit like a cooler. Good weight at 3.4 lb though at 40L capacity. No external water bottle holder.

    Alpaka Elements Travel Backpack

    Kinda seems like an Aer Travel Pack 3 style (even similar price) but slightly lighter (3.5lb versus 3.9lb) and with a better water bottle holder. Wish it ditched the admin compartment and then its 35L size would be pretty compelling.

    Peak Design 45L

    4.5 lb make it a hefty one (the heaviest on this list?), makes sense given that it’s 45L which is a bit more than I’d want to gamble with on flights. Lots of great touches though, and dang do I love Peak Design’s packing cubes. Probably the most innovative and simple way to hide the backpack straps too, since you can just quickly slide them under the back padding. Wish they did a 40L bag and made it lighter.

    Cotopaxi Allpa 35

    3.5 lb. Too much organization, no external water bottle storage. Stowable shoulder straps is nice.

    Bellroy Transit Backpack Plus

    No external water bottle pocket, straight to jail. Honestly would be a pretty compelling bag if not though, has just one big bucket and 38L. Can’t stow straps either. Doesn’t look like any iPad storage available.

    Fjallraven Travel Pack

    40L, 3.6 lb, not too heavy! Don’t really like the design visually, and I normally quite like Fjallraven stuff.

    ULA Dragonfly

    Holy crap, 1.5 lb. Little on the small side at 30L though for the main interior area per tests like OneBagTravels, wish it was a smidge bigger. Really impressive looking bag given the weight, would love to see a 35-40L version of this bag.

    Patagonia Black Hole Mini MLC Travel Pack

    Well that’s a mouthful of a name! Seems to be just a massive pit that holds a full 30L which is awesome. Looks like an awesome water bottle holder. Don’t love that it has a mesh covering over the interior, so you have to unzip two things to get to it, or leave a thing just in perpetual flapping mode. No load lifters on the back though is kind of a bummer, but it does allow you to hide the backpack straps. Laptop compartment area also zips fully open and has a small iPad area.

    2.8 lb makes it even lighter than my Osprey Farpoint, and it even seems to have more side structure for easily packing things in.

    If this one was offered in a 35L or a 40L (the 45L is slightly too big and exceeds a lot of carry-on size limits for airlines I use) it’d basically be perfect. I would rank this number 2.

    Conclusion

    I basically want a combination of the Tortuga Lite, Patagonia, and Minaal. I saw a post on Reddit the other day where someone made their own really cool bag from scratch, while that’s undoubtedly an incredible difficult task that kinda sounds fun, maybe I’ll slowly try to learn that!

    If you have a bag recommendation that you think I might like and isn’t on this list hit me up on Twitter, Mastodon, or Threads!


  • A free, 3D printable Meta Quest 3 stand

    April 22, 2024

    A vertical, 3D printable Meta Quest 3 stand sitting on an oak desk with a monitor in the background

    People were really kind and seemed to enjoy my 3D printable Apple Vision Pro stand, a stand I designed in Fusion 360 with the goal of being visually appealing and compact as it stored the headset vertically so it wouldn’t take up too much space on your desk.

    Turns out there were quite a few folks requesting a similar style stand for their Meta Quest 3 so this weekend I set aside a bit of time to design such a variation, and I’m really happy with how it came out.

    Download link. It’s completely free to download, and consider giving it a boost by clicking the little purple rocket! It’s like when YouTubers ask you for a like, except in this case boosts give me a small credit toward a 3D printing accessory I’ve had my eyes on.

    Changes versus Vision Pro stand

    The Meta Quest 3 stand beside the Vision Pro stand, both holding their devices, on an oak desk with a monitor.

    The Meta Quest 3 has quite a few differences versus the Vision Pro so I redesigned the stand in some significant ways to better match the headset:

    • Spots for docking your controllers in the base. This both acts as a counterweight as the stand no longer has a need for a battery slot like the Vision Pro stand, and serves as a handy place to set your controllers. Set them down and they settle into the carved out grooves very satisfyingly
    • Top “pringle” that the headset rests on is slightly tweaked in width and height/amplitude to better nestle the Quest 3
    • So as to easily differentiate it form the Vision Pro stand if you have both side by side, I added a subtle design on the top pringle mimicking the Meta Quest 3’s front sensor array. Fun fact: it’s the exact same size and spacing!
    • Moved dowel/rod more toward center of stand, which allows for better compatibility with the Quest’s headband style
    • Removed cable organizer as there are no cables to organize!

    As before, you can use any kind of 3/4" (18.5mm) dowel to add a splash of customizability, from walnut to maple to copper to steel, or the download also just includes a 3D printable dowel.

    Hope you enjoy it! It’s a lot of fun learning Fusion 360, haha. The base’s size is unchanged from the Vision Pro’s and the pringle is very similar, so if you’re fortunate enough to have both a Vision Pro and Quest 3 both stands should look very nice next to each other.


  • Qi2 is kinda underwhelming

    April 20, 2024

    Using MagSafe for portable battery packs has so many niceties versus Qi1:

    • Increased communication with the device, allowing for better efficiency due to better thermal management and charging
    • Easily view the charge percentage of the external battery when first attaching it, and at any other point right from the OS
    • Reverse-wireless-charging, so if you charge your phone while the pack is attached, the phone will charge up first and then send energy to the battery pack
    • Magnets for better charging reliability (no vibrating off the small charging zone and waking up to a dead phone) and better efficiency (induction points are perfectly lined up), though this point is almost always mimicked in Qi1 battery packs

    Qi2 was supposed to be a glass of ice water to those in hell of Qi1, and I was hyped! Apple stopped making MagSafe battery packs themselves, and their old pack used Lightning instead of the newer USB-C, so I was excited to see third-parties bring MagSafe into the golden age of USB-C.

    The reality though is… kinda lame right now with most of those benefits not being a thing?

    Precursor: most “MagSafe” batteries are just Qi1

    Fred from Scooby Doo unmasking some person who has a disguise on that says 'totally legit MagSafe' and when the disguise is off it's revealed it's just Qi1 with a magnet

    So many magnetic battery pack makers say “MagSafe compatible” on the product page, which leads people to think they’re getting the more efficient charging of MagSafe as well as the extra functionality.

    The word “compatible” is doing a lot of heavy lifting there, just indicating that the battery packs have a magnet in them and using just regular Qi1 charging. None of the actual MagSafe benefits are available. This means they’re kinda “dumb” and don’t communicate well with the host device, leading to hotter devices (and thus faster battery degradation) and lower efficiency due to energy loss as heat.

    “Just use cables!”

    Cables are much more efficient than wireless charging, so this sounds like a great idea until you try it, and going through an airport with cables dangling and potentially snagging on things is so, so much less convenient than just having a slightly thicker phone. I’d take a dip in efficiency for a massive increase in convenience, but if you can deal with cable charging while running around, I tip my hat to you.

    That being said, the battery cases of yesteryear were a nice middle ground.

    The only Qi2 battery pack is kinda lacking?

    Despite being announced last year, there’s still like… only one manufacturer offering Qi2 battery packs: Anker. The rest are still “coming soon”.

    Outside of only being offered in bulky sizes, Anker’s offerings seem to miss some of the biggest niceties of MagSafe, presumably through no fault of their own.

    Firstly, Qi2 battery packs seemingly don’t even support OS level battery status! I can only assume this is an omission on Apple’s part rather than Anker’s, and is hopefully fixed in the future, but that was one of the aspects of Qi2 I was looking forward to the most. All you get is a slightly larger indicator of the phone’s battery level, but not the pack’s. Being able to easily see the percentage of your battery pack when using the phone and connecting it is super handy.

    A minor one, but it also seems to get slightly warmer than Apple’s offering. Qi2 is supposed to also offer 15W of output whereas Apple’s battery was 7.5W, but Max Tech did a thorough review versus Apple’s old pack, and while it’s worth a watch, the tl;dw is that it seems to warm up quickly and slow down pretty considerably as a result (and be no faster than 7.5W).

    Lastly, there’s no reverse wireless charging like Apple’s MagSafe pack has, so if you’re charging your iPhone over USB-C and have the pack attached, the pack won’t charge. You’d have to plug the pack itself in, which would transfer more heat to the iPhone rather than the other way around with MagSafe (I’d rather have the cheap battery pack get hotter, rather than the expensive iPhone).

    Why Apple’s old pack is actually good

    Apple battery widget showing status of MagSafe battery pack'
    Credit: Apple

    Apple’s offering on paper seems pretty great: smaller than the competitors, and integrates perfectly with iOS, meaning you get more intelligent charging and power delivery (and a cooler device), and you can see the status of the battery right in the operating system.

    Two issues though: price/availability (at almost twice the competitors’), and the Lightning connector (in our beautiful new USB-C world, I do not want to be carrying a Lightning cable around anymore).

    The first one’s indeed tricky. As Apple’s is discontinued, they’re hard to find, and there’s a lot of counterfeit ones online and in local classifieds, so be careful.

    For the Lightning issue, the iPhone supports reverse wireless charging (Qi2 does not on iPhones as of April 2024), so if you plug in your USB-C iPhone with the pack still attached, it’ll charge up the battery after it’s done charging up the phone! No Lightning cable needed. In fact, even the new Qi2 batteries don’t support this, they only support plugging in the battery itself which charges the iPhone, which sounds fine, but the battery is the one inductively charging the iPhone, so the iPhone bears the brunt of the heat, rather than the other way around, which is less than ideal for battery health.

    Lastly, Apple’s is much thinner than the competitor’s offerings. Which is fine, I don’t need to double my battery life, I just want to extend it when I know I might otherwise be cutting it close by the end of the day.

    (Though one bonus for Qi2 battery packs is that they do support wired charging between the battery and iPhone though, unlike Apple’s, which would be a handy feature for charging faster in a pinch, but not a deal-breaker for me.)

    “Apple’s battery capacity is so small”

    There were some strange musings at the beginning complaining that Apple’s is only 1,500 mAh, while everyone else is 5,000 mAh, and that’s a perfect indication of why mAh is such a terrible unit for measuring batteries (the recent Vision Pro battery size story being another one). Battery capacity is a function of Amp-hours and crucially Voltage (multiply them together to get Watt-hours, an actual measurement of capacity), Apple’s battery uses twice the Voltage (7.6 V versus 3.7 V), so the actual capacities are 11 Watt-hours for Apple’s and 18.5 Watt-hours for others.

    Further, if you take the smallest previewed Qi2 case: Belkin’s 5,000 mAh option (available in Australia), it’s 17mm thick, where Apple’s is only 11mm.

    So Apple’s battery capacity being 40% smaller than Belkin’s (11 versus 18.5) kinda makes sense when you see that it’s because it’s 35% thinner.

    End notes

    All in all, maybe someone like Belkin will release their Qi2 and it’ll be faster, more energy dense, less hot than Apple’s, and have USB-C, but even then at least as of April 2024 it will still lack the super handy OS-level battery status, as well as reverse-charging. Maybe Apple will add those in iOS 18 and will be well in the world, or maybe Apple will surprise us all and release a new, USB-C MagSafe battery pack.

    (Also, my one criticism of all battery packs is they and the iPhone really need a magnet connection near the bottom too, right now the top-half is secure but the bottom half can just swing around. That part kinda makes me miss old school battery cases.)


  • Waterfield's weirdly compact Apple Vision Pro Case

    April 2, 2024

    Vision Pro on top of a blue lunchbox style case for it, next to a black and white cat looking at its paws

    Disclosure: Waterfield sent this in exchange for a review. Yeah, that probably colors something on a deep-down, subconscious level, but I won’t say anything that I don’t truly believe.

    Unlike a phone or laptop, the Vision Pro is one of those products that is particularly tricky to take around without a case. I’ve got around this by wrapping it in a hoodie and throwing it in my backpack, but I was looking for a more… tidy solution longterm.

    Apple’s own case was an obvious option, but the size kinda scared me. I like packing pretty light for trips, and only ever bring one bag, so the thought of half the bag being taken up by a Vision Pro case wasn’t the most alluring, so a compact size was pretty near the top of my list, so when Waterfield announced their case offering and toted its size my ears immediately perked up.

    I’ve traveled a bit with it now, and I’ve really come to like it. Here’s my thoughts, plus some questions from folks on Twitter and Mastodon.

    Design/build quality

    Case open with Vision Pro nestled snuggly inside with an additional fleece inner case that holds accessories. HomePod mini and iPod nano in background.

    The design is reminiscent of a really well-made lunchbox. It’s sturdy, and the outside feels like that ballistic nylon material that a good backpack is made out of, while the inside is a really soft fleece. The inside houses a second (also fleece-wrapped) case which can house all the Vision Pro accessories and even has individual slots for ZEISS lenses if you have those. In mine I put a charging brick, the polishing cloth, and the headband (note on that below), and spare contact lenses in the ZEISS slots. There’s a separate spot on the “ceiling” of the inner case for the Vision Pro’s external battery.

    Case open with battery slid into a fleece pocket on the lid of the case, with a black cat in the background.

    Everything just fits super snuggly and thoughtfully, which is kinda what I like most about it. So many Vision Pro cases on the market are just versions for other headsets that happen to fit the Vision Pro to different levels of success, and while that’s obviously totally fine, maybe it’s because the Vision Pro was so expensive, but there’s something really nice feeling about a case designed specifically around it. It’s like using a baseball mitt made just for your hand versus borrowing your friend’s: both are cool, one just makes you go oooooo.

    (Though the battery fits so snuggly that it’s a bit tricky to get in when you wrap the cable around it. Instead, wrap the cable around your fingers, slide the battery in, and then slide the organized cable on top of the battery.)

    The zippers feel great, not YKK (oops, I’ve been told they are YKK, that makes sense given the quality, they just have nice ‘Waterfield’ branding on them) but metal and have a water-resistant coating which I always like to see. It has a grab handle on top, and attachments for shoulder straps that I likely won’t use. Same with the top, it has a little zipper pocket that I’m not sure I’d use beyond the AirTag pocket in it, but you could put something thin up there (like another cord, or a small external battery, or maybe a very small foldable external keyboard), and even if you don’t use it the pocket is pretty flat so you don’t lose any room to it.

    Water droplets beading on top of the case and zipper.

    I do wish they had more colorways. I’m on Apple’s train and not a big fan of wrapping my devices in dead animals (though Apple’s FineWoven solution there seems to have missed the mark, but Aptera has some really cool plant-based biodegradable leathers for their car), and wish Waterfield had options outside of black and blue for non-leather (that black and white stormtrooper style one looks so cool). That being said the photographs of the blue on their website almost don’t do it justice, it’s a really nice navy in real life with just the right amount of color to be a bit fun. But I still want stormtrooper!

    Compactness

    Case open with various items inside, including a banana, an iPhone 15 Pro, a light bulb, a VHS copy of The Mogul, and a Blue Eyes White Dragon card.
    Some items you may have around for scale

    It’s really compact, there’s honestly not really any room to possibly shrink it further. It’s not tiny per se, but going off numbers from each website, Apple’s Vision Pro case is about 10.9 Liters in volume (0.38 cubic feet), and the Waterfield case is 5.0 Liters (0.18 cubic feet), which is a substantial difference. If you throw it in a 20 Liter everyday carry backpack, you’ve gone from it taking 55% of the interior space to just 25%.

    A big part of how they accomplish this is by having you take the headband off which saves a ton of room length-wise versus storing it fully expanded. This is something I was hoping someone would do well before this case was even announced, and it’s plain to see how much room it saves.

    The separate fleece inner case that holds items
    The cutely named “Hat Box” that zippers open to add accessories

    My idea was just to fold the fabric of the headband in a bit, and when I saw Waterfield required you to actually disconnect the headband I was kind of disappointed because that sounds like a pain. But in all honesty, if you kept the band connected, you would have to bend it more on the side part than I would be personally comfortable to get it as compact (see below, though), and if you only folded in the back part (and not the sides) it would add a decent amount more length to the case. Still a bunch of space savings to be sure, but in my opinion unless you’re putting it in the case every night the compactness this creates is worth the minor inconvenience of disconnecting the headband.

    Protectiveness

    Dumbbell sitting on top of a book ('what if?' by Randall Monroe) sitting on top of the case showing no deforming.

    I was somewhat worried where it’s not an actual hardshell style case like Apple’s or others that it would be more like a tech pouch and not have much protectiveness, but honestly it’s pretty darn sturdy. That’s hard to articulate, but as an example if I put a 20 lb dumbbell on top of it with nothing inside, you can see it doesn’t deform at all. (This does not mean it will survive a 20 lb dumbbell actually dropping on it, to be clear.)

    It definitely won’t be as protective as a hardcase, but it’s still pretty darn protective. Mine will always be stored in my backpack but if it were to take a small fall alone I personally wouldn’t worry.

    Questions

    I asked on Twitter and Mastodon if anyone had any questions about it, and there were some great ones that I thought I’d answer here.

    Do you still need Apple’s front cover?

    The inside is soft felt so I personally don’t bother, but it does still fit if you’re so inclined.

    Do you HAVE to take the headband off to store it?

    Technically no, it fits with the band still attached, but to me it’s like that scene in Cinderella when all the stepsisters try to fit in the glass slipper and are shoving their foot in to just barely make it fit. In other words, it seems to put a bit more pressure on the side of the headband than I’d like, but hey, if you want to risk it the $99 to replace the Solo Knit band if I’m right is one of the more affordable Vision Pro accessories. (All this also applies to the Dual Loop band, too.)

    Vision Pro with the Solo Loop band still on and showing it quite squished at the extremity.

    Could a cat sleep on it?

    If a 20 lb dumbbell doesn’t deform it I think most cats could sleep on it fine, the issue is that it’s kinda small so not the most comfy. My cats stick to sleeping on my backpacks.

    Does the battery fit in it? Could it hit the glass?

    Yeah, there’s a proper space right above the Vision Pro. If you put it in the intended way (front of Vision Pro in toward the non-zippered edge) the Vision Pro’s front will be toward the front of the case, and the battery in the ceiling will be toward the back of the case, sitting on the storage accessory, so no chance of contact.

    Can the battery stay plugged in in the case?

    Yeah! I find the standby life of the Vision Pro isn’t the best, and it sometimes gets warm, so I personally would unplug it for travel, but you definitely don’t have to.

    Does a Mac mini fit inside?

    A Mac mini diagonally in the case indicating it won't quite fit.

    Nope, just slightly more compact. That would have been cool though.

    Can you use it like a lunchbox?

    Honestly felt is a pretty effective thermal insulator so probably, but I’d worry about condensation build up.

    Ease of zipping/speed of use

    I find water-resistant zippers always have a bit more friction than their normal counterparts, so it’s a bit of a two-handed operation to zip open/closed. But I feel like if I was on an airplane, it’d be pretty quick to disconnect the headband, throw it on the pouch, throw in the Vision Pro, zip it up and leave. Not as fast as yeeting your Vision Pro into a backpack if there was like an emergency, but pretty reasonable if you have a second.

    What does it carry?

    The case on a table showing the items it can carry, including the Vision Pro, a USB-C cable, the two included headbands, an AirTag, the battery, AirPods Pro, a polishing cloth, a PSA 9 first edition Zubat Pokémon card, the inner fleece case, two contact lenses, and a charging brick.

    It can carry the Vision Pro, both headbands, polishing cloth, a wall brick, a USB-C cable, ZEISS inserts (or contact lenses), an AirTag, and something small in the top pocket. Here’s what I have in mine.

    Conclusion

    At $159 for my non-leather version, it’s not cheap (though it’s cheaper than Apple’s own case), but I keep coming back to it reminding me of a really nice backpack. You can go on Amazon and find an obscure brand backpack for super cheap that will absolutely get the job done at the cost of long term confidence, or, if you want to treat yourself you can buy a really quality backpack from a trusted brand with a bunch of delightful touches that make you smile when you use it even years later. Some people get weirdly into nice backpacks, I’m unfortunately one of them.

    So all in all, it’s a great example of how something seemingly simple can be elevated by thoughtful design and quality materials.

    Non-affiliate link to the Waterfield case


  • Recreating Apple's beautiful visionOS search bar

    March 24, 2024

    visionOS Music app in the Joshua Tree environment with the window showing a search bar at the top with rounded corners

    Many of Apple’s own visionOS apps, like Music, Safari, and Apple TV, have a handy search bar front and center on the window so you can easily search through your content. Oddly, as of visionOS 1.1, replicating this visually as a developer using SwiftUI or UIKit is not particularly easy due to lack of a direct API, but it’s still totally possible, so let’s explore how.

    First let’s get a few ideas out of the way to maybe save you some time.

    On the SwiftUI side .searchable() in is an obvious API to try, but even with the placement API, there’s no way to put in the center (by default it’s to the far right, and you can either put it to the far left, or under the navigation bar, by passing different values). With toolbarRole, similar deal, values like .browser will put it to the left instead, but not middle. ToolbarItem(placement: .principal) meets a similar fate, as in visionOS, the principal position is to the left, not center.

    Basic SwiftUI window with search bar to the left and text in the middle that simply says 'Perhaps the coolest View ever'
    Default SwiftUI searchable() position

    In UIKit, the situation is similar, where navigationItem.titleView is to the left, not center, on visionOS, and I was unable to find any other APIs that worked here.

    You could technically recreate navigation bar UIView/View from scratch, but navigation bars on visionOS have a nice progressive blur background that wouldn’t be fun to recreate, not to mention all the other niceties they have.

    All this to say, it’s totally possible there’s a clear API to do it, but I’ve dug around and poked a bunch of different people so it’s well hidden if it does exist! I’m assumning Apple’s using an internal-only API, or at least a custom UI here.

    SwiftUI doesn’t directly have the concept of a search bar view unfortunately, just the .searchable modifier that only takes a few arguments, so… you know…

    That Simpsons meme where they say 'Say the line, Bart!' but he responds 'Let's use UIKit' with much sadness

    We’ll create a SwiftUI interface into UIKit’s UISearchBar that allows us to store the typed text and respond when the user hits enter/return.

    struct SearchBar: UIViewRepresentable {
        @Binding var text: String
        var onSearchButtonClicked: () -> Void
    
        func makeUIView(context: Context) -> UISearchBar {
            let searchBar = UISearchBar()
            searchBar.delegate = context.coordinator
            return searchBar
        }
    
        func updateUIView(_ uiView: UISearchBar, context: Context) {
            uiView.text = text
        }
    
        func makeCoordinator() -> Coordinator { SearchBarCoordinator(self) }
    }
    
    class SearchBarCoordinator: NSObject, UISearchBarDelegate {
        var parent: SearchBar
    
        init(_ searchBar: SearchBar) {
            self.parent = searchBar
        }
    
        func searchBar(_ searchBar: UISearchBar, textDidChange searchText: String) {
            parent.text = searchText
        }
    
        func searchBarSearchButtonClicked(_ searchBar: UISearchBar) {
            parent.onSearchButtonClicked()
            searchBar.resignFirstResponder()
        }
    }
    

    Now we can easily use it as so:

    struct ContentView: View {
        @State private var searchText = ""
    
        var body: some View {
            SearchBar(text: $searchText) {
                print("User hit return")
            }
        }
    }
    
    Search bar at the very top but taking up full width so it overlaps the title in an ugly way

    Hmm, looks a little off.

    Step 2: Positioning

    Cool, we have a search bar, how do we position it? Again, tons of ways to do this. Perhaps the “most correct” way would be to completely wrap a UINavigationBar or UIToolbar, add a UISearchBar as a subview and then move it around in layoutSubviews relative to the other bar button items, titles, and whatnot. But that’s probably overkill, and we want a simple SwiftUI solution, so (as the great Drew Olbrick suggested) we can just overlay it on top of our NavigationStack.

    NavigationStack {
        Text("Welcome to my cool view")
            .navigationTitle("Search")
        }
    }
    .overlay(alignment: .top) {
        SearchBar(text: $searchText) {
            print("User hit return")
        }
    }
    

    This is actually great, as we get all the niceties of the normal SwiftUI APIs, and the system even appropriately spaces our search bar from the top of the window. Only issue is an obvious one, the width is all wrong. Studying how Apple does it, in the Music and Apple TV app the search bar just stays a stationary width as the window can’t get too narrow, but let’s modify ours slightly a bit so if it does get too narrow, our search bar never takes up more than half the window’s width (Apple’s probably does something similar, but more elegantly), by wrapping things in a GeometryReader. The height is fine to stay as-is.

    struct SearchBar: View {
        @Binding var text: String
        var onSearchButtonClicked: () -> Void
        
        var body: some View {
            GeometryReader { proxy in
                InternalSearchBar(text: $text, onSearchButtonClicked: onSearchButtonClicked)
                    .frame(width: min(500.0, proxy.size.width / 2.0))
                    .frame(maxWidth: .infinity, alignment: .center)
            }
        }
    }
    
    struct InternalSearchBar: UIViewRepresentable {
        @Binding var text: String
        var onSearchButtonClicked: () -> Void
    
        func makeUIView(context: Context) -> UISearchBar {
            let searchBar = UISearchBar()
            searchBar.delegate = context.coordinator
            return searchBar
        }
    
        func updateUIView(_ uiView: UISearchBar, context: Context) {
            uiView.text = text
        }
    
        func makeCoordinator() -> SearchBarCoordinator { SearchBarCoordinator(self) }
    }
    
    class SearchBarCoordinator: NSObject, UISearchBarDelegate {
        var parent: InternalSearchBar
    
        init(_ searchBar: InternalSearchBar) {
            self.parent = searchBar
        }
    
        func searchBar(_ searchBar: UISearchBar, textDidChange searchText: String) {
            parent.text = searchText
        }
    
        func searchBarSearchButtonClicked(_ searchBar: UISearchBar) {
            parent.onSearchButtonClicked()
            searchBar.resignFirstResponder()
        }
    }
    

    Which results in…

    Search bar at the top of the window, centered horizontally and not taking up the full width

    Bam.

    Step 3: Corner radius

    Our corner radius looks different than Apple’s at the top of the article!

    One oddity I noticed is different Apple apps on visionOS use different corner radii despite being that same, front and center search bar. (Rounded rectangle: Apple TV, Photos, App Store; circular: Music, Safari) Presumably this is just an oversight, but after poking some Apple folks it seems like the rounded option is the correct one in this case, and I too prefer the look of that, so let’s go with that one.

    One issue… The default is a rounded rectangle, not circular/capsule, and API to directly change this (as far as I can tell) is private API. But cornerRadius is just a public API on CALayer, so we just have to find the correct layer(s) and tweak them so they’re circular instead. We can do this by subclassing UISearchBar and monitoring its subviews for any changes to their layer’s corner radius, and changing those layers to our own circular corner radius.

    class CircularSearchBar: UISearchBar {
        private var didObserveSubviews = false
        private let desiredCornerRadius = 22.0
        private var observedLayers: [CALayer] = []
        
        deinit {
            // We need to manually track and remove CALayers we add observers for, the OS seemingly does not handle this properly for us, perhaps because we're adding observers for sublayers as well and there's timing issues with deinitialization?
            observedLayers.forEach { $0.removeObserver(self, forKeyPath: "cornerRadius") }
        }
        
        override func willMove(toWindow newWindow: UIWindow?) {
            super.willMove(toWindow: newWindow)
         
            // Adding to window
            guard !didObserveSubviews else { return }
            observeSubviews(self)
            didObserveSubviews = true
        }
            
        func observeSubviews(_ view: UIView) {
            view.layer.addObserver(self, forKeyPath: "cornerRadius", options: [.new], context: nil)
            view.subviews.forEach { observeSubviews($0) }
        }
            
        override func observeValue(forKeyPath keyPath: String?, of object: Any?, change: [NSKeyValueChangeKey : Any]?, context: UnsafeMutableRawPointer?) {
            guard keyPath == "cornerRadius" else {
                super.observeValue(forKeyPath: keyPath, of: object, change: change, context: context)
                return
            }
            
            guard let layer = object as? CALayer else { return }
            guard layer.cornerRadius != desiredCornerRadius else { return }
            
            layer.cornerRadius = desiredCornerRadius
        }
    }
    

    Which gives us this beautiful, circular result once we replace UISearchBar with CircularSearchBar.

    Search bar at the top of the window with a fully circular corner radius

    Step 4: Remove hairline

    A hairline border underneath the search bar in the center
    Nooo, what IS that?

    Just when you think you’re done, you notice there’s a little hairline border underneath the search bar that looks kinda off in our context. This is also not easily addressable with an API, but we can find it ourselves and hide it. You’d think you’d just find a thin UIView and hide it, but Apple made this one nice and fun by making it a normal sized image view set to an image of a thin line.

    Knowing that, we could find the image view and sets its image to nil, or hide it, but through something done behind the scenes those operations seem to be overwritten, however just setting the alpha to 0 also hides it perfectly.

    private func hideImageViews(_ view: UIView) {
        if let imageView = view as? UIImageView {
            imageView.alpha = 0.0
        }
        
        view.subviews.forEach { hideImageViews($0) }
    }
    

    And add hideImageViews(self) to our willMove(toWindow:) method.

    Search bar at the top of the window, without any border underneath, shown in an app called Penguin Finder with a penguin as the window's background image with a progressive blur at the top under the search bar
    That's it! 🎉

    With that, we’re done and we should have nice solution for a search bar that more closely mimics how visionOS shows prominent search bars, at least until Apple hopefully adds a more straightforward way to do this! (FB13696963)