One trick doctors hate that will make your iPhone… Sorry.
I’ve been loving my iPhone Air. A week in I think it’s my favorite iPhone since the iPhone X.
It has that indescribable feeling that the original MacBook Air had. That, “Wow, computers can be like this?” feeling that’s hard to quantify when you’re just looking at a spec sheet. Picking it up still makes me smile, and I love that the screen is bigger than any iPhone I’ve ever had, while the device overall feels smaller because it’s so thin.
Even the battery has been surprisingly good, I feel like I have more at the end of the day than I did with my 15 Pro that I’m upgrading from, and Apple’s numbers seem to back this up, showing 23 hours of video playback on the 15 Pro and an increase to 27 on the Air.
The only area I’ve kinda been disappointed on is the camera situation. No, not the telephoto, I really never used that personally. And not the ultrawide, for me that just felt too wide. But the ultrawide did allow for awesome macro capabilities that this iPhone Air is sorely lacking. At least currently.
The problem
The iPhone Air’s minimum focus distance is just too short. Don’t get me wrong, it’s a hair better than my 15 Pro’s main sensor, allowing you to get maybe 15% closer to the subject, but it still does that annoying thing where when you want to take a picture of a small object and have it take up the full field of view, it often goes blurry right when you get it framed up.
But then I was like, duh, it’s a 48 MP sensor, so I can zoom into 2x to get twice as close and still get a nice 12 MP photo. So you just pull the phone back a bit, hit 2x, and bam, you have a beautifully framed close shot, that’s actually in focus.
An “easy” solution
Look, I won’t claim camera sensor software is in any way easy, but all the other iPhones do an awesome job of detecting when the main sensor reached its minimum focus distance and then hopping over the the ultrawide to get a nice macro shot that’s still in focus.
I’d love if Apple implemented similar software magic on the Air, where instead of having to manually hit that 2x when it gets blurry, Apple detected you hit the minimum focus distance and instructed you to “back up a bit” and then automatically made it in focus through cropping in on the main sensor.
Would it change the world? No, but it’d take out a manual step I’m finding myself doing somewhat frequently.
Will this level up your macro photography so that you can take pictures of the pollen on the leg of a bee? No, absolutely not. But getting about twice as close to your subject is a massive difference, especially since I find right now the Air’s minimum focus distance is just on the edge of where I want it to be when holding things close.
Hopefully the brilliant folks at Halide, (Not Boring), or Obscura (listed in alphabetical order so I don’t have to rank my friends) can integrate something like this into their awesome apps if Apple themselves do not.
Okay, I have to be doing something astronomically stupid, right? This should be working? I’m playing around with an App Clip and want to just run it on the device as a test, but no matter how I set things up nothing ever works. If you see what I’m doing wrong let me know and I’ll update this, and hopefully we can save someone else in the future a few hours of banging their head!
Xcode
App Clips require some setup in App Store Connect, so Apple provides a way when you’re just testing things to side step all that: App Clip Local Experiences
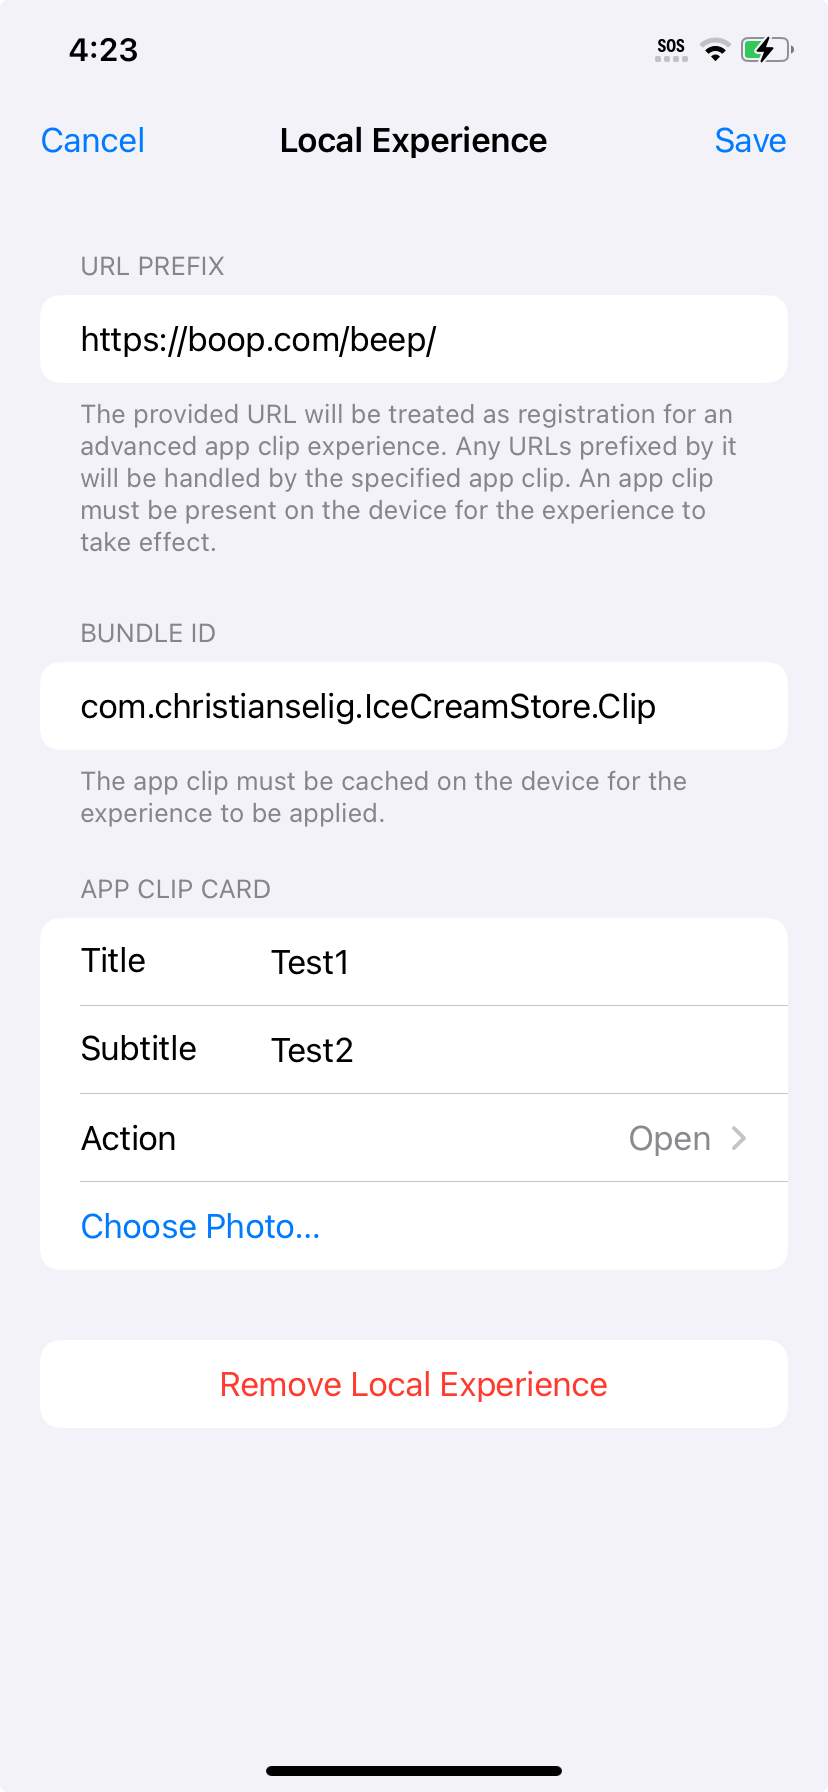
I create a new sample project called IceCreamStore, which has the bundle ID com.christianselig.IceCreamStore. I then go to File > New > Target… > App Clip. I choose the Product Name “IceCreamClip”, and it automatically gets the bundle ID com.christianselig.IceCreamStore.Clip.
I run both the main target and the app clip target on my iOS 18.6 phone and everything shows up perfectly, so let’s go onto actually configuring the Local Experience.
Local Experience setup
I go to Settings.app > Developer > App Clips Testing > Local Experiences > Register Local Experience, and then input the following details:
Bundle ID: com.christianselig.IceCreamStore.Clip (note thne Apple guide above says to use the Clip’s bundle ID, but I have tried both)
Title: Test1
Subtitle: Test2
Action: Open
Upon saving, I then send myself a link to https://boop.com/beep/123 in iMessage, and upon tapping on it… nothing, it just tries to open that URL in Safari rather than in an App Clip (as it presumably should?). Same thing if I paste the URL into Safari’s address bar directly.
I also tried generating an App Clip Code, but upon scanning it with my device I get “No usable data found”.
Help
What’s the deal here, what am I doing wrong? Is my App Store Connect account conspiring against me? I’ve tried on multiple iPhones on both iOS 18 and 26, and the incredible Matt Heaney (wrangler of App Clips) even kindly spent a bunch of time also pulling his hair out over this. We even tried to see if my devices were somehow banned from using App Clips, but nope, production apps using App Clips work fine!
If you figure this out you would be my favorite person. 😛
Update: solution. Sorta?
Okay, seems the solution is two-fold:
Make sure in addition to the main app target being installed, you manually switch to the App Clip target and install that itself directly too
Generate an App Clip Code via the generator CLI (or a nice GUI) and scan that, rather than trying to open from URLs directly
I will say I do love how Apple stuff 99% of the time does “just work”, but dang those times when it doesn’t I really wish they showed some diagnostics I could see as to why.
While the GIF format is a little on the older side, it’s still a really handy format in 2025 for sharing short clips where an actual video file might have some compatibility issues.
For instance, I find when you just want a short little video on your website, a GIF is still so handy versus a video, where some browsers will refuse to autoplay them, or seem like they’ll autoplay them fine until Low Battery Mode is activated, etc. With GIFs it’s just… easy, and sometimes easy is nice. They’re super handy for showing a screen recording of a cool feature in your app, for instance.
What’s not nice is the size of GIFs. They have a reputation of being absolutely enormous from a filesize perspective, and they often are, but that doesn’t have to be the case, you can be smart about your GIF and optimize its size substantially. Over the years I’ve tried lots of little apps that promise to help to no avail, so I’ve developed a little script to make this easier that I thought might be helpful to share.
Naive approach
Let’s show where GIFs get that bad reputation so we can have a baseline.
We’ll use trusty ol’ ffmpeg (in the age of LLMs it is a super handy utility), which if you don’t have already you can install via brew install ffmpeg. It’s a handy (and in my opinion downright essential) tool for doing just about anything with video.
For a video we’ll use this cute video of some kittens I took at our local animal shelter:
It’s 4K, 30 FPS, 5 seconds long, and thanks to its H265/HEVC video encoding it’s only 19.5 MB. Not bad!
Let’s just chuck it into ffmpeg and tell it to output a GIF and see how it does.
ffmpeg -i kitties.mp4 kitties.gif
Okay, let that run and- oh no.
For your sake I’m not even going to attach the GIF here in case folks are on mobile data, but the resulting file is 409.4MB. Almost half a gigabyte for a 5 second GIF of kittens. We gotta do better.
Better
We can do better.
Let’s throw a bunch of confusing parameters at ffmpeg (that I’ll break down) to make this a bit more manageable.
fps=24: we’re dropping down to 24 fps from 30 fps, many folks upload full YouTube videos at this framerate so it’s more than acceptable for a GIF.
scale=iw*sar:ih: sometimes video files have weird situations where the aspect ratio of each pixel isn’t square, which GIFs don’t like, so this is just a correction step so that doesn’t potentially trip us up
scale=1000:-1: we don’t need our GIF to be 4K, and I’ve found 1,000 pixels across to be a great middle ground for GIFs. The -1 at the end just means scale the height to the appropriate value rather than us having to do the math ourselves.
The rest is related to the color palette, we’re telling ffmpeg to scan the entire video to build an appropriate color palette up, and to use the Floyd-Steinberg algorithm to do so. I find this algorithm gives us the highest quality output (which is also handy for compressing it more in further steps)
This gives us a dang good looking GIF that clocks in at about 10% the file size at 45.8MB.
ffmpeg is great, but where it’s geared toward videos it doesn’t do every GIF optimization imaginable. You could stop where we are and be happy, but if you want to shave off a few more megabytes, we can leverage gifsicle, a small command line utility that is built around optimizing GIFs.
We’ll install gifsicle via brew install gifsicle and throw our GIF into it with the following:
O3 is essentially gifsicle’s most efficient mode, doing fancy things like delta frames so changes between frames are stored rather than each frame separately
lossy=65 defines the level of compression, 65 has been a good middle ground for me (200 I believe is the highest compression level)
gamma=1.2 is a bit confusing, but essentially the gamma controls how the lossy parameter reacts to (and thus compresses) colors. 1 will allow it to be quite aggressive with colors, while 2.2 (the default) is much less so. Through trial and error I’ve found 1.2 causes nice compression without much of a loss in quality
The resulting GIF is now 23.8MB, shaving a nice additional 22MB off, so we’re now at a meager 5% of our original filesize.
That’s a lot closer to the 4K, 20MB input, so for a GIF I’ll call that a win. And for something like a simpler screen recording it’ll be even smaller!
Make it easy
Rather than having to remember that command or come back here and copy paste it all the time, add the following to your ~/.zshrc (or create it if you don’t have one already):
This will allow you to easily call it as either gifify <input-filename.mp4> <output-gifname.gif> and default to the values above, or if you want to tweak them you can use any optional parameters with gifify --fps 30 --gamma 1.8 --width 600 --lossy 100 <input-filename.mp4> <output-gifname.gif>.
For instance:
# Using default values we used abovegifify cats.mp4 cats.gif
# Changing the lossiness and gammagifify --lossy 30 --gamma 2.2 cats.mp4 cats.gif
My favorite memory of my M1 Pro MacBook Pro was the whole sensation of “holy crap, you never hear the fans in this thing”, which was very novel in 2021.
Four years later, this MacBook Pro is still a delight. It’s the longest I’ve ever owned a laptop, and while I’d love to pick up the new M4 goodness, this dang thing still seems to just shrug at basically anything I throw at it. Video editing, code compiling, CAD models, the works. (My desire to update is helped though by the fact I got the 2TB SSD, 32GB RAM option, and upgrading to those on new MacBooks is still eye wateringly expensive.)
But my MacBook is starting to show its age in one area: it’s not quiet anymore.
If you’re doing anything too intensive like compiling code for awhile, or converting something in Handbrake, the age of the fans being quiet is long past. The fans are properly loud. (And despite having two cats, it’s not them! I clean out the fans pretty regularly.)
Enter the thermal paste
Everyone online seems to point toward one thing: the thermal paste on computers tends to dry up over the years.
What the heck is thermal paste? Well, components on your computer that generate a lot of heat are normally made to touch something like a copper heatsink that is really good at pulling that heat away from it. The issue is, when you press these two metal surfaces against each other, even the best machining isn’t perfect and you there’s microscopic gaps between them meaning there’s just air at those parts, and air is a terrible conductor of heat.
The solution is to put a little bit of thermal paste (basically a special grey toothpaste gunk that is really good at transferring heat) between them, and it fills in any of those microscopic gaps.
The problem with this solution is after hundreds and hundreds of days of intense heat, the paste can dry up into something closer to almost a powder, and it’s not nearly as good at filling in those gaps.
Replacement time
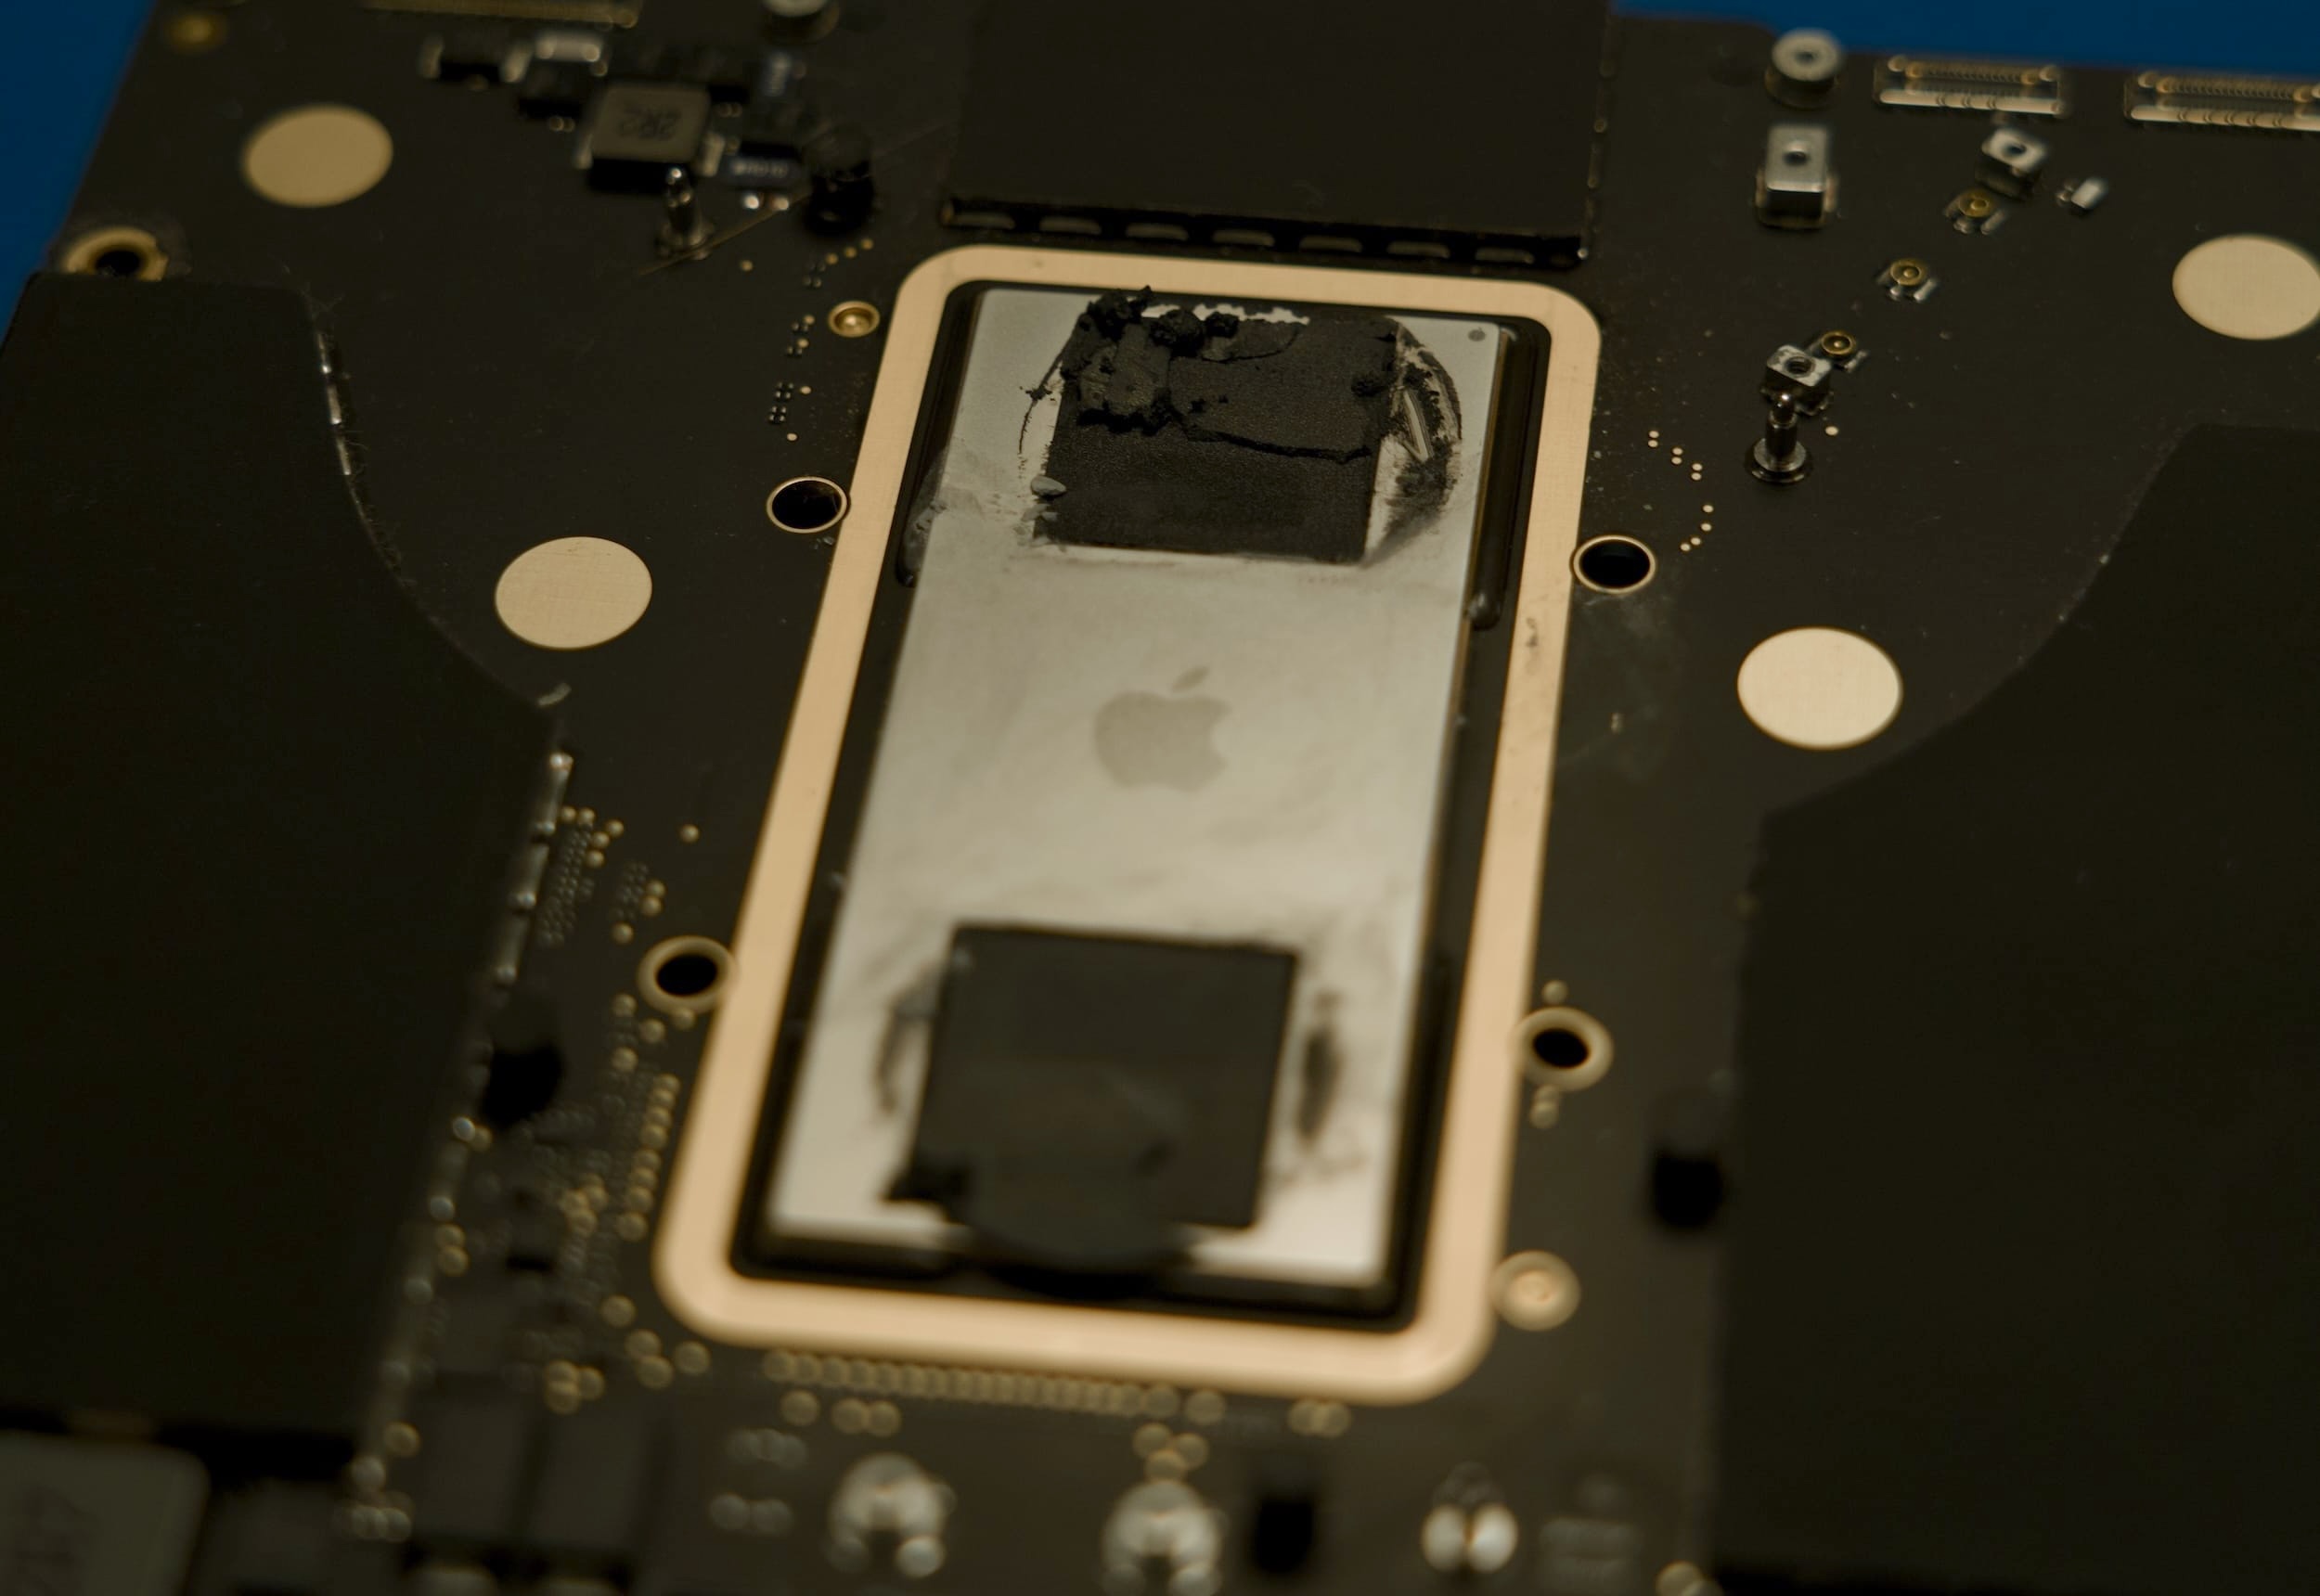
The logic board!
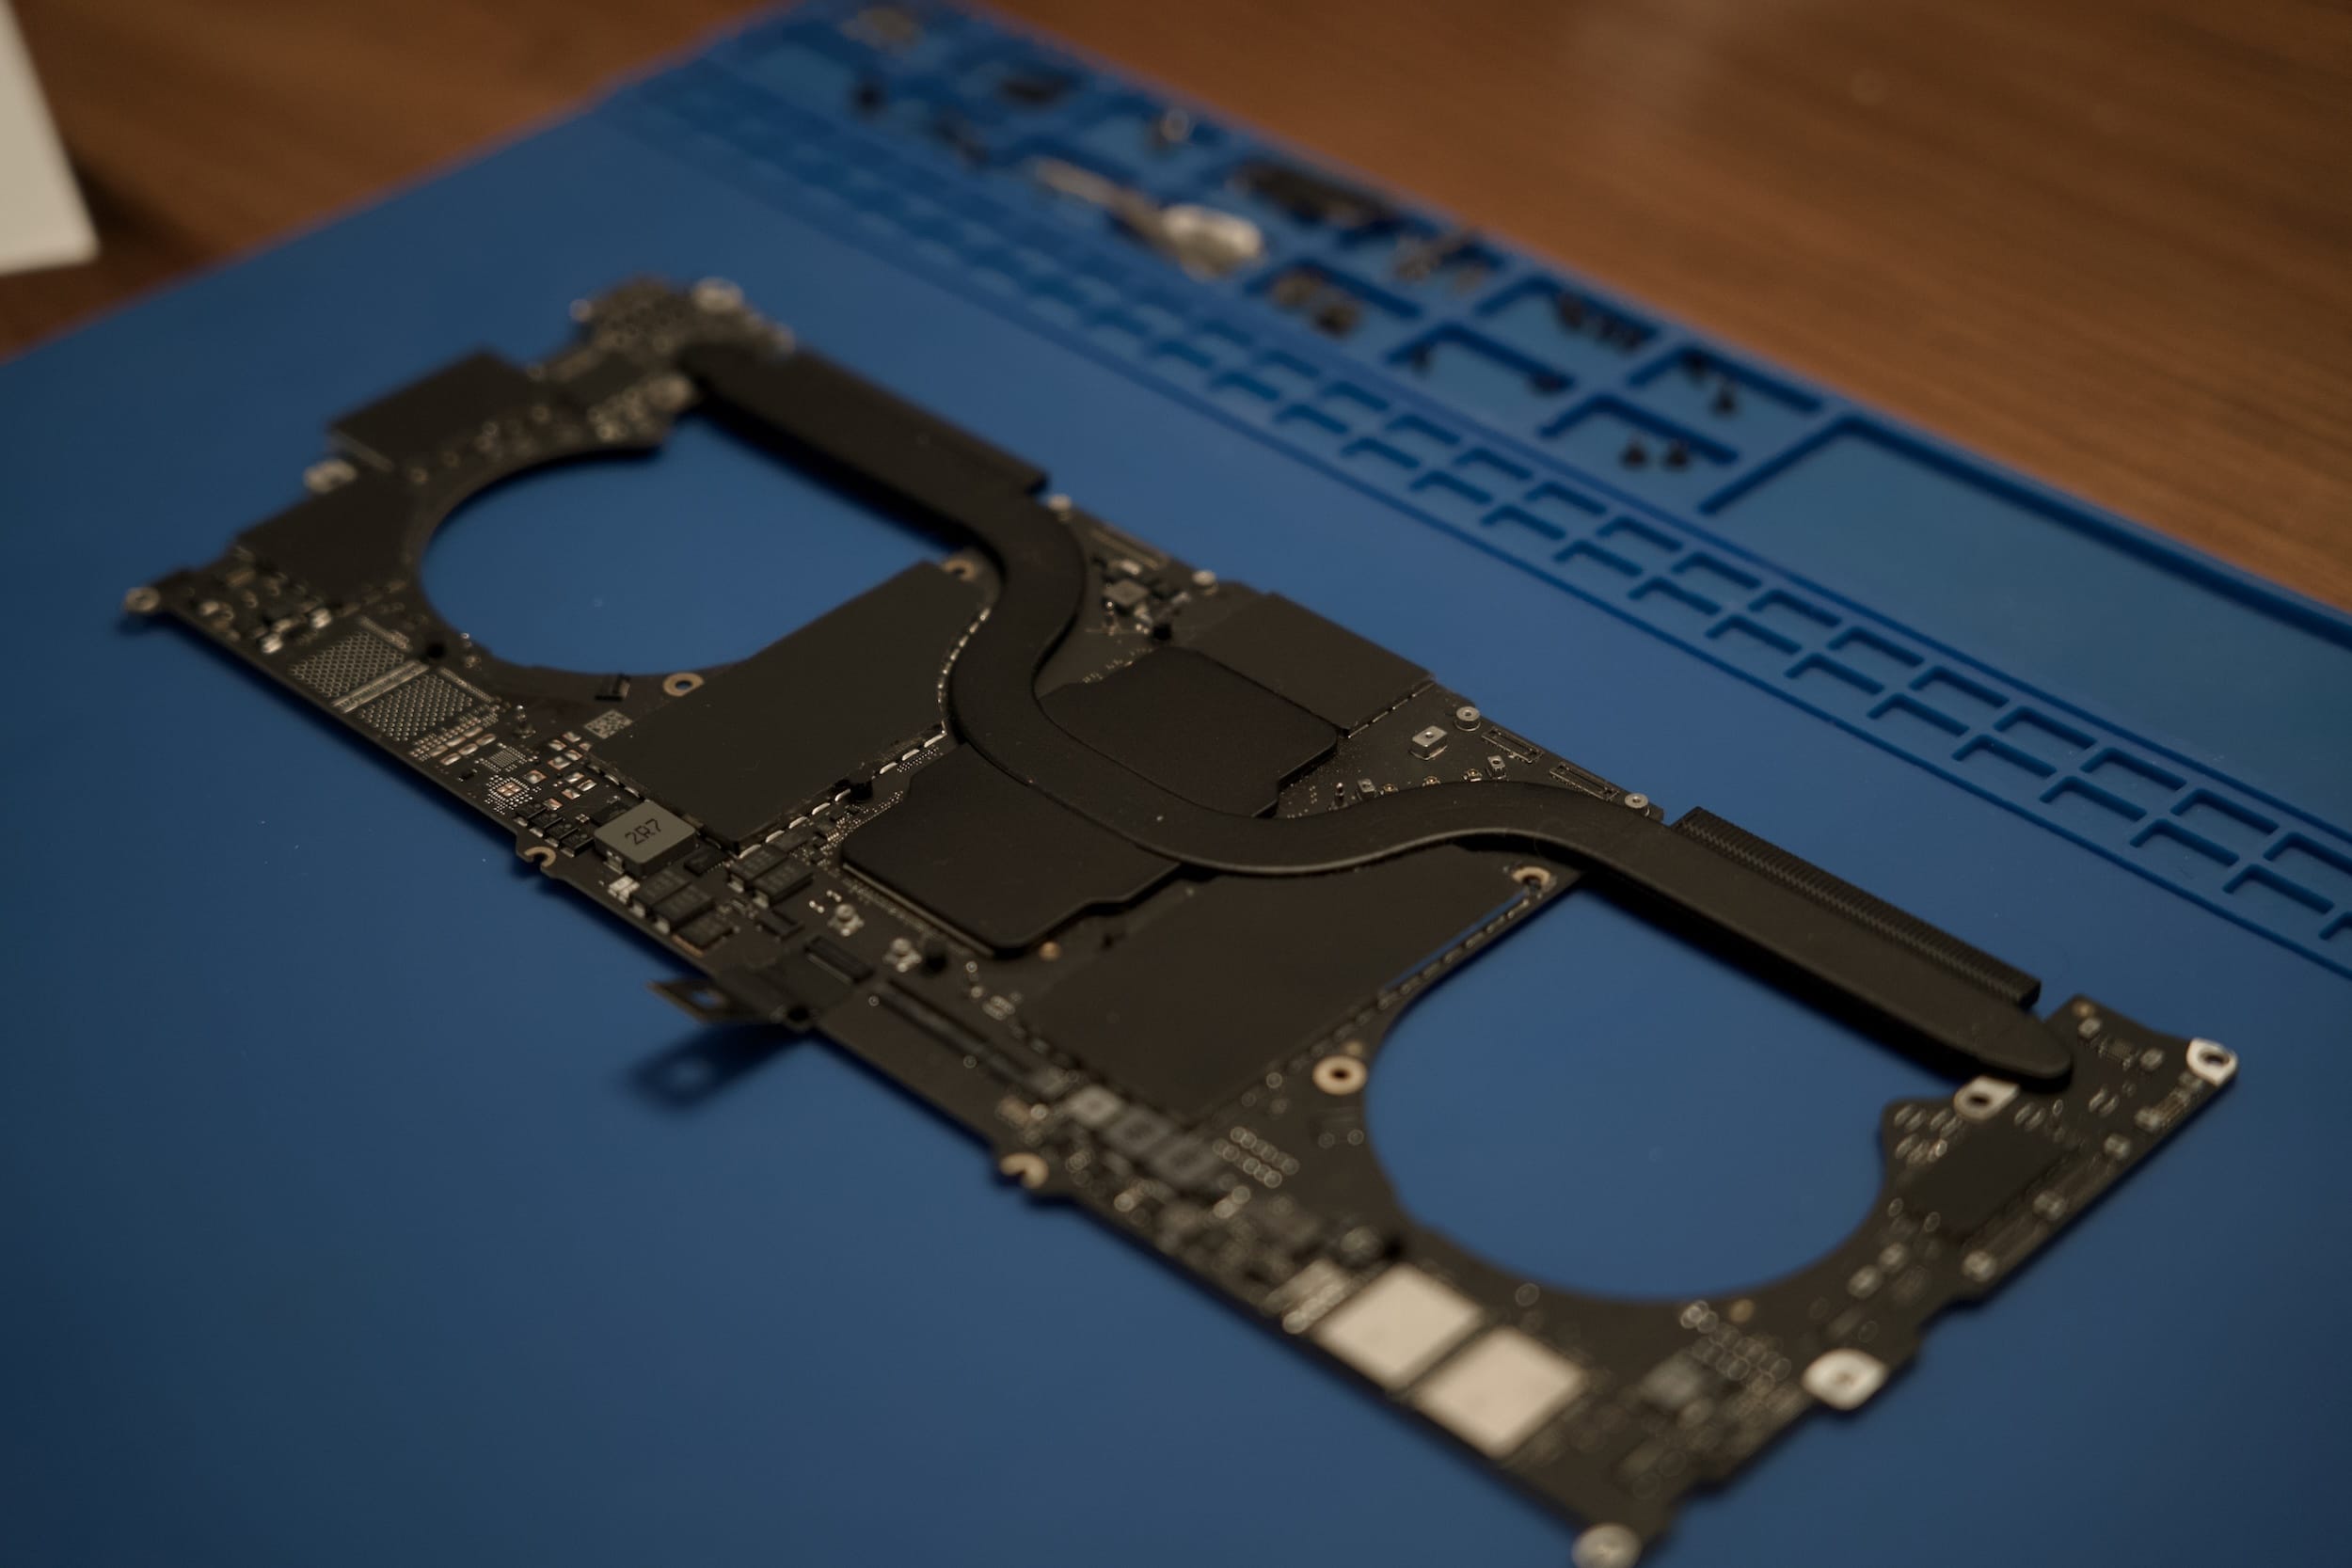
MacBook thermal paste isn’t anything crazy (for the most part, see below), custom PC builders use thermal paste all the time so incredibly performant options are available online. I grabbed a tube of Noctua NT-H2 for about $10 and set to taking apart my MacBook to swap out the aging thermal paste. And thankfully, iFixit has a tremendous, in depth guide on the disassembly required, so I got to it.
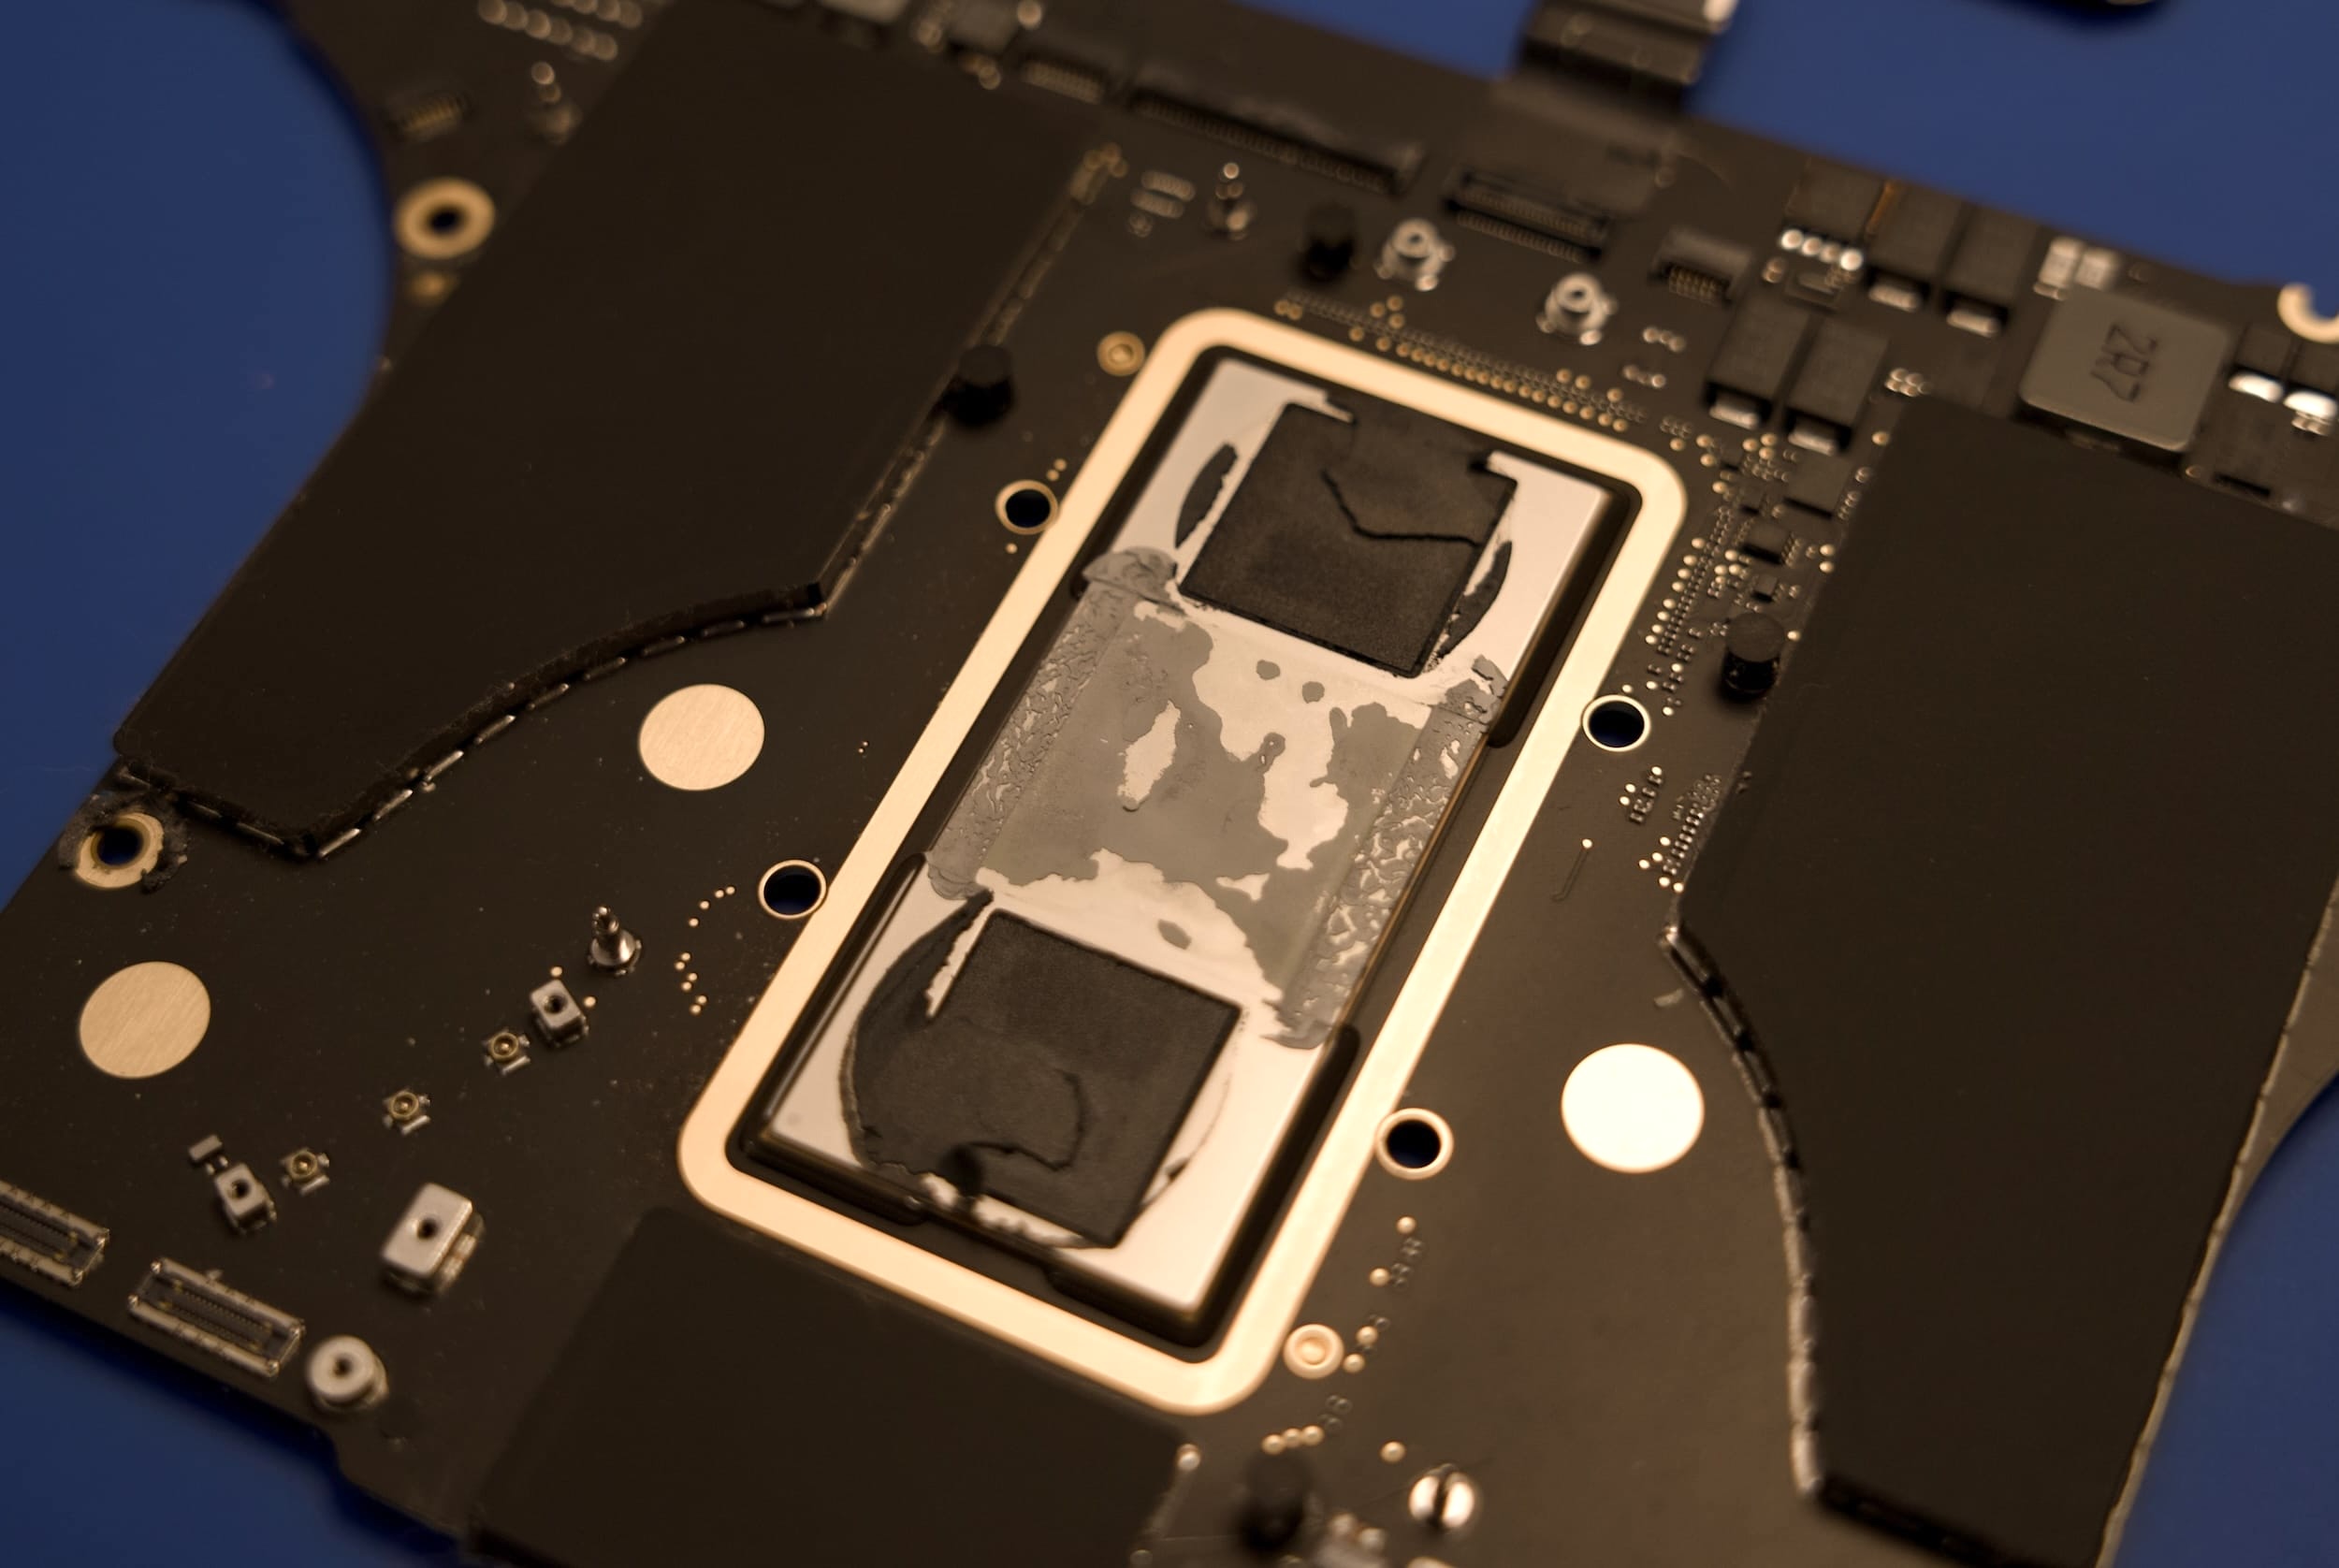
Indeed, that grey thermal paste looked quite old, but also above and below it (on the RAM chips) I noticed something that didn’t quite seem like thermal paste, it was far more… grainy almost?
Spottiness is due to half of it being on the heatsink
It turns out, ending with my generation of MacBooks (lucky me!) Apple used a very special kind of thermal compound often called “Carbon Black”, which is basically designed to be able to bridge an even thicker gap than traditional thermal paste. I thought about replacing it, but it seems really hard to come across that special thermal compound (and do not do it with normal thermal paste) and my RAM temperatures always seemed fine (65°C is fine… right?) so I just made sure to not touch that.
For the regular grey thermal paste, I used some cotton swabs and isopropyl alcohol to remove the dried up existing thermal paste, then painted on a bit of the new stuff.
Disaster
To get to the underside of the CPU, you basically need to disassemble the entire MacBook. It’s honestly not that hard, but iFixit warned that the fan cables (which also need to be unclipped) are incredibly delicate. And they’re not wrong, seriously they have the structural integrity of the half-ply toilet paper available at gas stations.
So, wouldn’t you know it, I moved the left fan’s cable a bit too hard and it completely tore in half. Gah.
I found a replacement fan online (yeah you can’t just buy the cable, need a whole new fan) and in the meantime I just kept an eye on my CPU thermals. As long as I wasn’t doing anything too intensive it honestly always stayed around 65° which was warm, but not terrifying (MacBook Airs completely lack a fan, after all).
Take two
A few days later, the fans arrived, and I basically had to redo the entire disassembly process to get to the fans. At least I was a lot faster this time.
The fan was incredibly easy to swap out (hats off there, Apple!) and I screwed everything back together and began reconnecting all the little connectors.
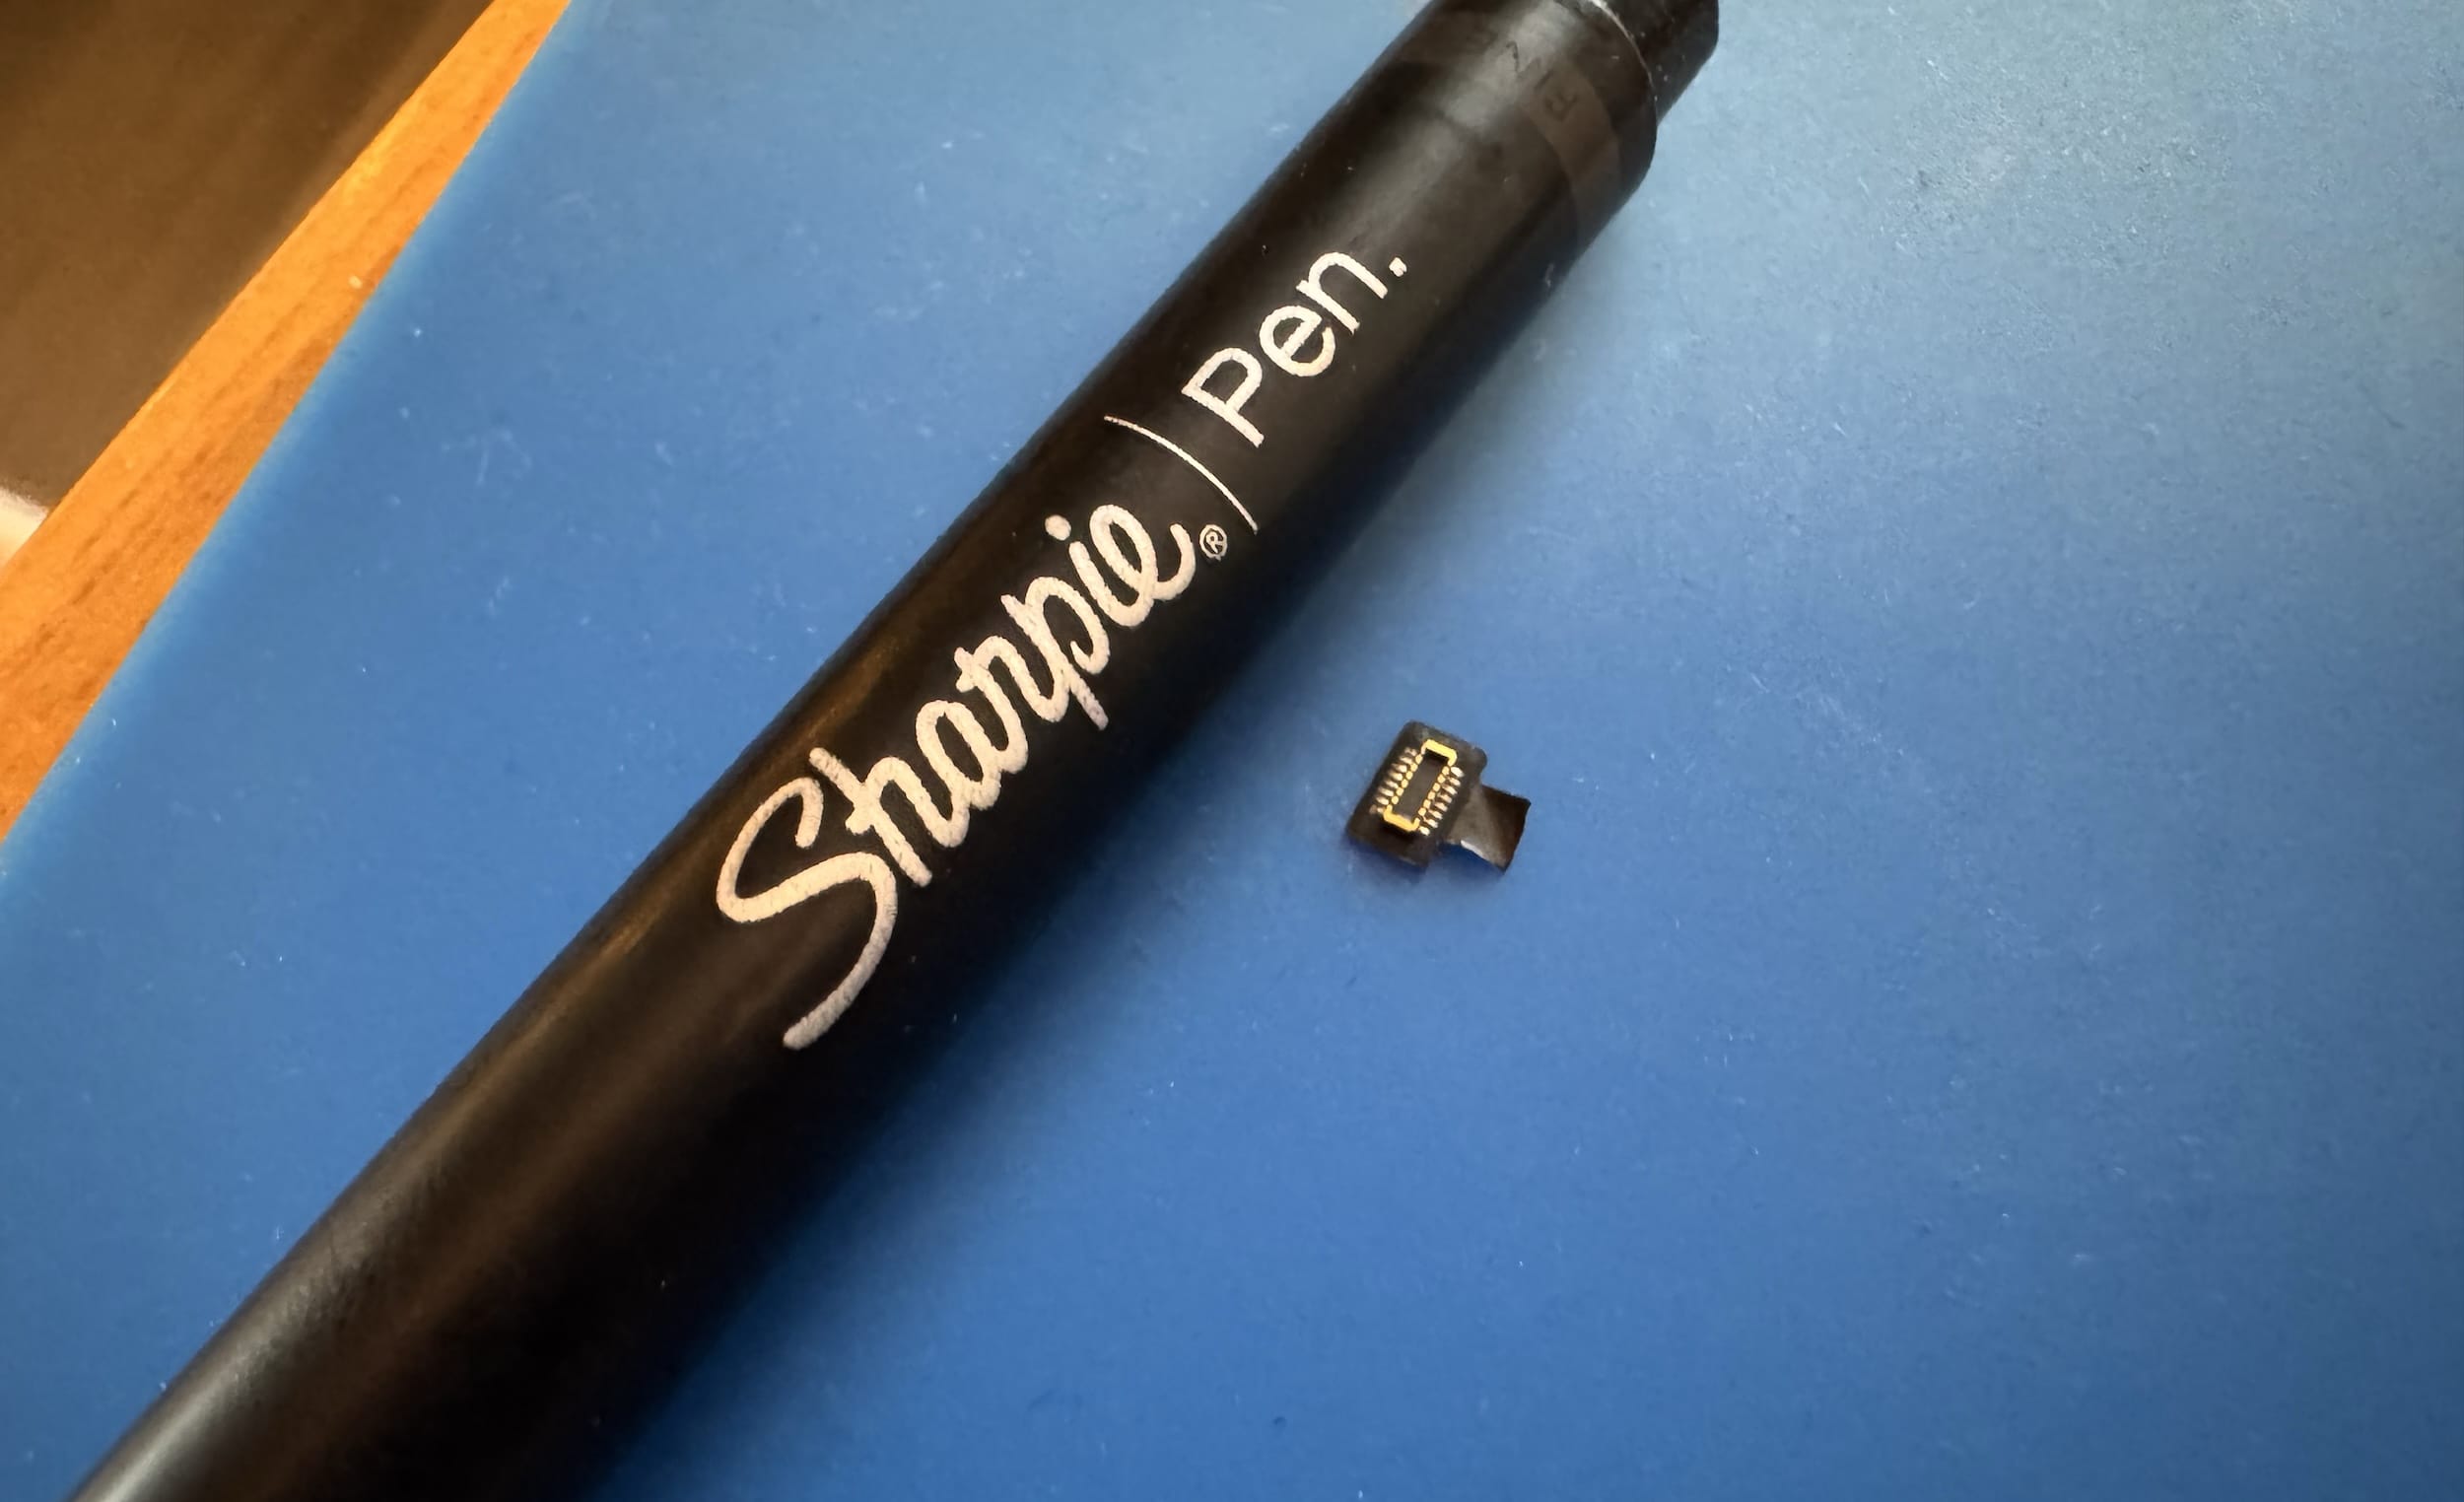
Until I saw it: the tiny (made of the same half ply material as the fan cable) Touch ID sensor cable was inexpicably torn in half, the top half just hanging out. I didn’t even touch this thing really, and I hadn’t even got to the stage of reconnecting it (I was about to!), it comes from underneath the logic board and I guess just the movement of sliding the logic board back in sheared it in half.
me
Bah. I looked up if I could just grab another replacement cable here, and sure enough you can… but the Touch ID chip is cryptographically paired to your MacBook so you’d have to take it into an Apple Store. Estimates seemed to be in the hundreds of dollars, so if anyone has any experience there let me know, but for now I’m just going to live happily without a Touch ID sensor… or the button because the button also does not work.
RIP little buddy
(And yeah I’m 99.9% sure I can’t solder this back together, there’s a bunch of tiny lanes that make up the cable that you would need experience with proper micro-soldering to do.)
Honestly, the disassembly process for my MacBook was surprisingly friendly and not very difficult, I just really wish they beefed up some of the cables even slightly so they weren’t so delicate.
The results
I was going to cackle if I went through all that just to have identical temperatures as before, but I’m very happy to say they actually improved a fair bit. I ran a Cinebench test before disassembling the MacBook the very first time to establish a baseline:
Max CPU temperature: 102°C
Max fan speed: 6,300 RPM
Cinbench score: 12,252
After the new thermal paste (and the left fan being new):
Max CPU temperature: 96°C
Max fan speed: 4,700 RPM
Cinbench score: 12,316
Now just looking at those scores you might be like… so? But let me tell you, dropping 1,600 RPM on the fan is a noticeable change, it goes from “Oh my god this is annoyingly loud” to “Oh look the fans kicked in”, and despite slower fan speeds there was still a decent drop in CPU temperature! And a 0.5% higher Cinebench score!
But where I also really notice it is in idling: just writing this blog post my CPU was right at 46°C the whole time, where previously my computer idled right aroud 60°C. The whole computer just feels a bit healthier.
So… should you do it?
Honestly, unless you’re very used to working on small, delicate electronics, probably not. But if you do have that experience and are very careful, or have a local repair shop that can do it for a reasonable fee (and your MacBook is a few years old so as to warrant it) it’s honestly a really nice tweak that I feel will hopefully at least get me to the M5 generation.
I upload YouTube videos from time to time, and a fun comment I often get is “Whoa, this is 8K!”. Even better, I’ve had comments from the like, seven people with 8K TVs that the video looks awesome on their TV.
And you guessed it, I don’t record my videos in 8K! I record them in 4K and upscale them to 8K after the fact.
There’s no shortage of AI video upscaling tools today, but they’re of varying quality, and some are great but quite expensive.
The legendary Finn Voorhees created a really cool tool though, called fx-upscale, that smartly leverages Apple’s built-in MetalFX framework. For the unfamiliar, this library is an extension of Apple’s Metal graphics library, and adds functionality similar to NVIDIA’s DLSS where it intelligently upscales video using machine learning (AI), so rather than just stretching an image, it uses a model to try to infer what the frame would look like at a higher resolution.
It’s primarily geared toward video game use, but Finn’s library shows it does an excellent job for video too.
I think this is a really killer utility, and use it for all my videos. I even have a license for Topaz Video AI, which arguably works better, but takes an order of magnitude longer. For instance my recent 38 minute, 4K video took about an hour to render to 8K via fx-upscale on my M1 Pro MacBook Pro, but would take over 24 hours with Topaz Video AI.
# Install with homebrewbrew install finnvoor/tools/fx-upscale
# Outputs a file named my-video Upscaled.movfx-upscale my-video.mov --width 7680 --codec h265
Anyway, just wanted to give a tip toward a really cool tool! Finn’s even got a version in the Mac App Store called Unsqueeze with an actual GUI that’s even easier to use, but I really like the command line version because you get a bit more control over the output.
8K is kinda overkill for most use cases, so to be clear you can go from like, 1080p to 4K as well if you’re so inclined. I just really like 8K for the future proofing of it all, in however many years when 8K TVs are more common I’ll be able to have some of my videos already able to take advantage of that. And it takes long enough to upscale that I’d be surprised to see TVs or YouTube offering that upscaling natively in a way that looks as good given the amount of compute required currently.
Obviously very zoomed in to show the difference easier
If you ask me, for indie creators, even when 8K displays are more common, the future of recording still probably won’t be in native 8K. 4K recording gives so much detail still that have more than enough details to allow AI to do a compelling upscale to 8K. I think for my next camera I’m going to aim for recording in 6K (so I can still reframe in post), and then continue to output the final result in 4K to be AI upscaled. I’m coming for you, Lumix S1ii.


